
Availability
This feature is included in the following plans.
- Free
- Starter
- Essential
- Premium
- Custom
Introduction
Have you ever wondered which subject line leads to more opens, whether a red button receives more clicks than a green one, or whether including your company name in the sender name makes a difference?
Mailjet's A/B Testing feature helps you answer these questions by comparing different versions of the same campaign.
What Does A/B Testing Mean?
A/B Testing lets you compare up to 10 versions of an email campaign. You can test different subject lines, sender names, images, buttons, and other elements to discover which version performs best.
First, decide which element to test and create your versions. Mailjet sends each version to a portion of the contacts in your selected list. You can then compare the results using metrics such as opens and clicks.
Depending on your settings, you can manually choose a winning version or let Mailjet automatically send the best-performing version to the remaining recipients. You can also use Split Send to distribute the different versions without selecting a winner.
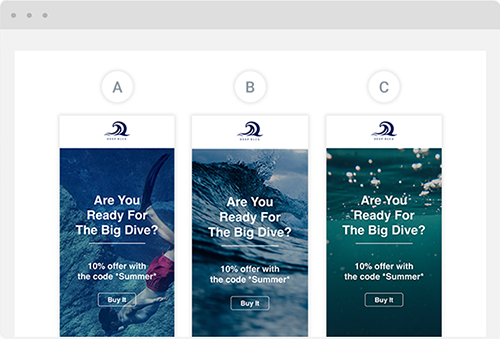
You can combine A/B Testing with Segmentation and Campaign Comparison to better understand your audience and improve campaign performance.
Creating Campaign Versions
Creating an A/B campaign involves four main steps:
- Set up the campaign and configure its sending details.
- Design your first email and create the versions you want to compare.
- Configure the test sample and the winner-selection criteria.
- Send or schedule the A/B campaign and review the results.
Go to the Campaigns page and click Create a campaign to get started.
Step 1: Set Up Your Campaign
The Campaign details page is where you configure your campaign before sending it.
- Name: Give your campaign a unique name for internal reference. Click Edit name to enter or change it. Recipients will not see this name.
- Contact list: Click Select recipients to choose the audience for your campaign. You can also apply a segment if needed. For more information, see the Segmentation Guide.
- From / Subject Line: Click the pencil icon to configure the campaign's subject, preview text, sender name, sender address, and optional reply-to address.
- Content: Click Design email to select a template and design your email.
For A/B campaigns, once you’ve created your versions, you can configure the metadata for each version separately and adjust the winner-selection settings, as explained in Step 3.
👉Configure Your Campaign Metadata
Campaign metadata is managed on the Campaign details page, separately from your email template's design. Open From / Subject Line using the pencil icon to edit these fields:
- Subject: Enter the subject shown in recipients' inboxes (up to 255 characters). Use Insert variable to personalize it, or select Ask AI for assistance.
- Preview text: Enter the text shown after the subject in most inboxes (up to 150 characters). You can also insert personalization variables.
- Sender name: Enter the name recipients will see as the sender (up to 100 characters).
- Sender address: Select the address used to send the campaign.
- Reply-to address (optional): Click Add a reply-to address if replies should go to a different address.
Click Save to apply your changes.
Step 2: Design Your Campaign Versions
Click Design email to open Mailjet's Email Editor. Add and customize text, images, buttons, and other content blocks using the drag-and-drop tools. For detailed design instructions, see Mailjet's Email Editor.
The first email you create is Version A. To create another version, open the version dropdown and select Create a new version.
Version B is created as an exact copy of the preceding version. If you then create Version C, it begins as a copy of Version B, and so on.
Make the changes you want to compare. For example, you can change the email content, images, or button design.
You can also A/B test different subject lines and sender information by configuring the metadata for each version separately on the A/B Campaign details page.
To Delete a version, open its version dropdown and select Delete this version. If you remove a version, the versions that follow it are renamed accordingly.
When your versions are ready, click Review & Send to return to campaign setup.
Step 3: Test Sample & Winner Criteria
After creating your campaign versions, configure the sample of recipients who will receive the test and how the winning version will be selected.
In the A/B test sample section, the default configuration uses 20% of your contacts for the test and automatically sends the winning version to the remaining recipients.
Click the pencil icon to change the test configuration.
👉Test Sample Size
Enter the percentage of your selected contact list that should receive the test versions. Mailjet distributes the test sample among your versions as evenly as possible.
You can choose between two testing approaches:
- Traditional A/B Testing: Send the different versions to a smaller sample of contacts, evaluate their performance, and send the winning version to the remaining recipients.
- Split Send: Send the versions across your selected recipient list without a later winner-selection step.
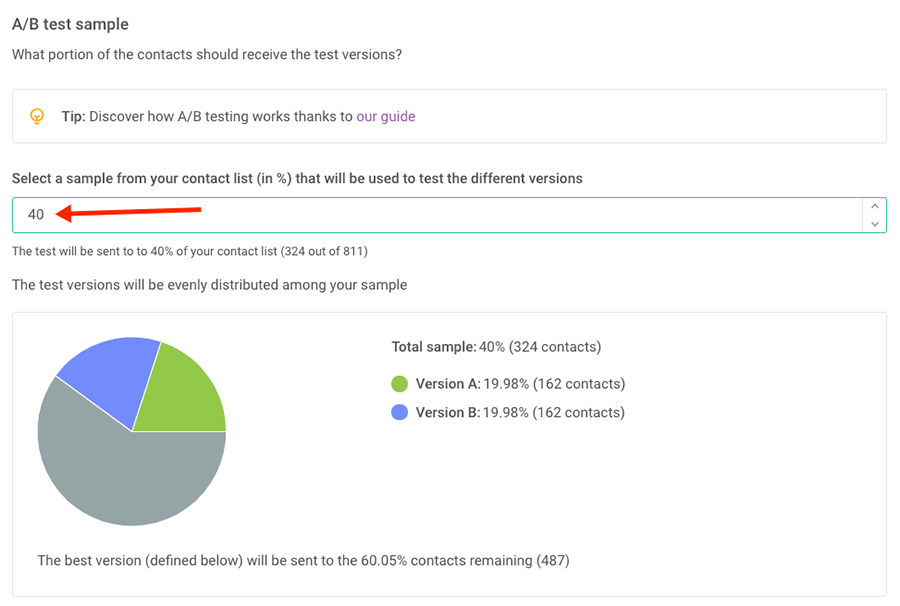
👉Winner Selection (Excluding Split Send)
With traditional A/B Testing, choose whether the winning version is selected Automatically or Manually.
Select your preferred mode and click Save.
In Automatic mode, you choose the performance metric Mailjet will use to determine the winner when the testing period ends. Available criteria include the highest open rate, highest click-through rate, lowest unsubscribe rate, and lowest spam rate.
Mailjet automatically sends the winning version to the remaining contacts and notifies you by email. If versions are tied, Mailjet uses the best overall score to select the winner.
In Manual mode, review the results and choose the winning version yourself. Let the test run for at least 1 hour before analyzing its results.
You must send the winning version within 7 days of the initial test send. If no winner is sent within that time, the campaign is canceled and you receive a notification.
Step 4: Schedule & Send
Before sending, review your recipient list, campaign metadata, email versions, test sample, and winner-selection settings.
Click Send now to send the test sample immediately or Schedule to choose a future date and time.
Campaigns can be scheduled up to 60 days in advance. Before confirming, check the scheduled date, time, and timezone. A scheduled campaign cannot be edited unless you cancel its scheduled send first. You can then make changes and schedule it again.
When using Automatic mode, schedule when the test sample will be sent and when Mailjet should send the winning version.
The test must run for at least 1 hour before a winner can be determined. For larger test samples, consider allowing a longer testing period to collect enough engagement data.
When using Manual mode, schedule the test sample and set an email reminder to review the results. Remember to select and send the winner within 7 days of the initial test send.
If you prefer to start immediately, click Send now.
Accessing Your A/B Campaign
You can access ongoing and completed A/B tests from the Campaigns page. Open the A/B test tab and select the campaign name.
While an Automatic-mode test is ongoing, you can:
- Switch to Manual mode to choose the winning version yourself.
- Adjust the winning-version criteria.
- Change the date or time when the winning version will be sent.
- Cancel the A/B test.
If no messages have been sent, the campaign is saved as a draft and can be sent later. If messages have already been sent, the campaign is saved as a regular campaign.
In Manual mode, you can select a winner after reviewing the test results. Choose the version from the dropdown and click Send now.
You can also change your reminder email's date or time, or cancel the A/B test.
If no messages have been sent, the campaign is saved as a draft and can be sent later. If messages have already been sent, the campaign is saved as a regular campaign.
Review the Results of a Completed A/B Test
After your A/B test is completed, you can compare the performance of its different versions using the comparison graph and campaign statistics table.
- A — Display controls: Change the display unit, time range, and chart type.
- B — Metrics: Select the statistic shown in the graph. Hover over the graph to view campaign KPIs.
- C — Version display: Click a campaign version's name to show or hide its results on the graph.
For more ways to compare campaign performance and benchmarks, see the Campaign Comparison Guide.