
Summary
- Getting Started with Mailjet’s Email Editor
- Create Your Campaign
- Content Tools
- Sections
- Conditional Sections
- Pre-built Sections
- Saved Sections
- Locking a Section
- Real-time Collaboration
- Header, Footer & Preview Text
- Unsubscribe Page Language
- Brand Kit
- Global Style Settings
- Logo Options
- Import Custom Fonts
- Personalizing Content
- Manage your Mobile View
- Responsive Design
- Enable Dark Mode Optimization
- Preview Your Campaign
- Email Preview
- Send a Test Email
- Save Your Campaign
- Send Your Campaign
Getting Started with Mailjet’s Email Editor
Email design with our intuitive drag-and-drop Email Editor is simple and the only tool you need for all your mailing needs. What can you create with our Email Editor? Take your pick:
- Campaigns - Also known as a newsletter, a marketing email, a mass market email. Whatever name you pick, a campaign is sent to a list of subscribers.
-
Templates - Create and manage your own predesigned templates and use them for a multitude of purposes:
- Marketing Templates - A template that reflects your brand and use it for future campaigns.
- Transactional Templates - A template stored on the Mailjet platform that can be used for all your transactional needs.
- Automation Template - A predesigned template you can use when creating an email automation workflow.
With Mailjet’s Email Editor, you can choose how to design your campaigns, emails and templates:
- Responsive Drag-and-Drop Editor - Use Mailjet’s Email Editor wide range of content tools to design your header & footer, and different sections within your email body.
- Use HTML - For anyone who is comfortable coding their emails with HTML directly.
- Use MJML - Use Mailjet's markup language MJML - the only framework designed to make coding responsive email easy. Save time and code more efficiently with MJML's semantic syntax.
You can also preview your email on different mobile devices right inside the Editor.
One more thing - Mailjet’s Email Editor is a responsive email editor. That means your mailings will be rendered properly on a computer, smartphone or tablet regardless of the recipient's email client. Mic drop.
Create Your Campaign
From the Campaigns page, click the 'Create a Campaign' button.
The 'Create a new campaign' page shows the different sections of your campaign.
As you complete each section, the corresponding checkmark will become green.
Once all sections are completed, you can then send your campaign or schedule it to be sent at a later time.
- Title: Give a title to your campaign to identify it in your reports. This is an internal name that only you will see.
- Language of Your Campaign: Choose the desired language.
- Contact list: Click the 'Select recipients' button to select your contact list. For premium plan users, create or apply a segmentation. For more information on segmentation, please read the FAQ: How to segment/filter contact lists
-
Content: Now the fun part: designing your content with Mailjet’s Email Editor. Get started by clicking 'Design email' to select your campaign template.
-
-
Subject: The subject of your campaign as it will appear in your recipient's inbox.
The subject limit is 100 characters, however for better open rates, keep your subject line to under 70 characters. -
From: Enter the name your recipients will see in the 'from' field and select a sending address from the drop-down list.
-
-
Let's get started - click 'Design email' to select your campaign template.
Select a Campaign Template
On this page you can select from the following template options:
-
Use a template from the gallery
Choose from a number of beautiful predefined templates -
Use one of my templates
Your own set of previously created templates -
Code in HTML
Create a campaign using HTML or import your own codeThis option is only recommended for users with advanced HTML skills as no support will be provided for troubleshooting custom code. However, any issues related to the Mailjet system will be handled by our support team. -
Code in MJML
Create a campaign using MJML or import your own codeThis option is only recommended for users with advanced MJML skills as no support will be provided for troubleshooting custom code. However, any issues related to the Mailjet system will be handled by our support team.
Once you have selected a template, the next step is to design your email with Mailjet’s Email Editor.
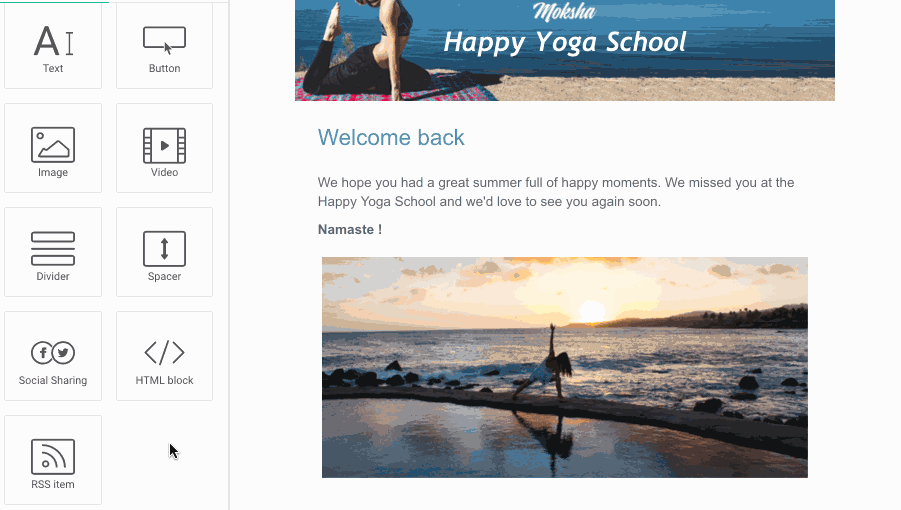
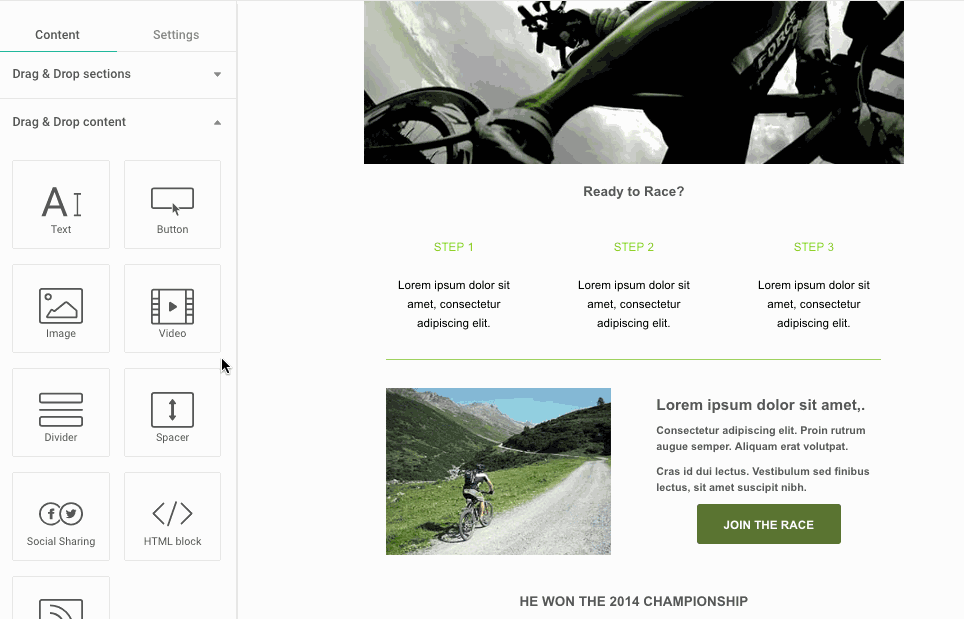
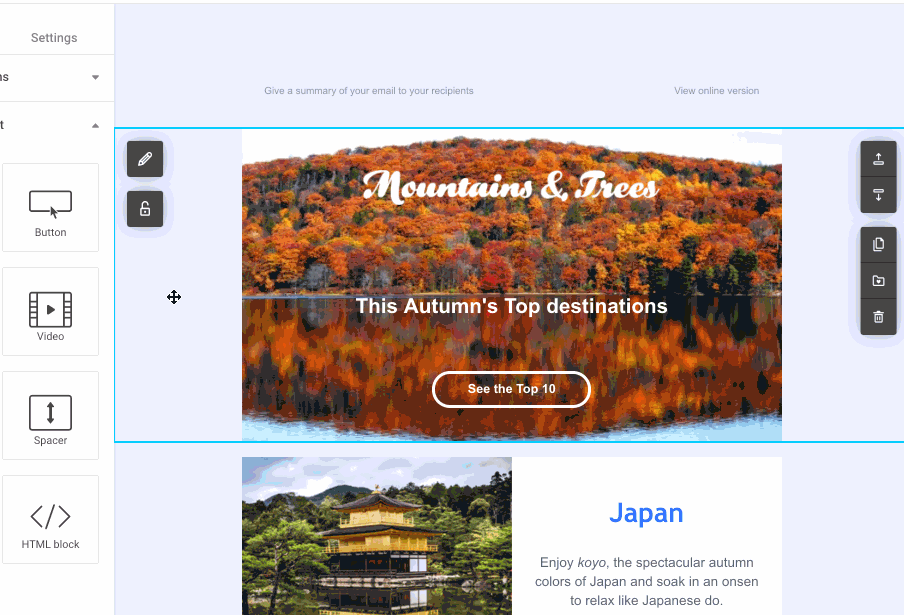
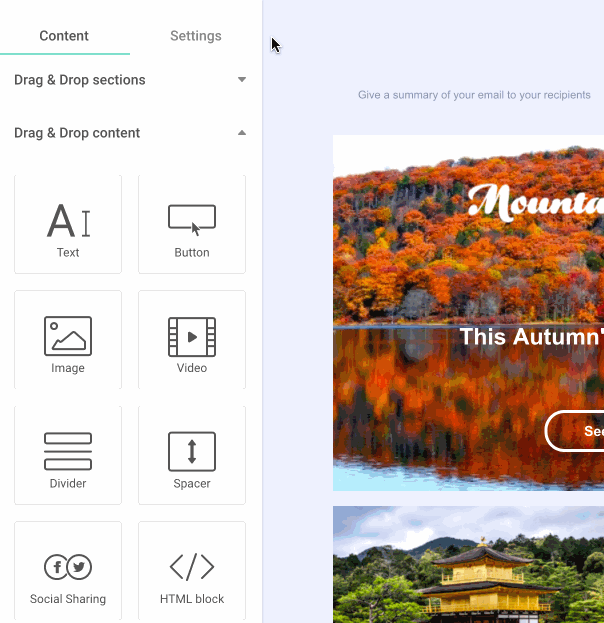
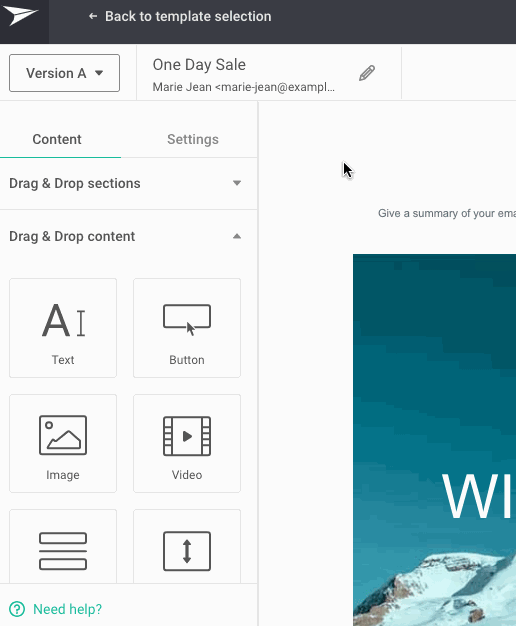
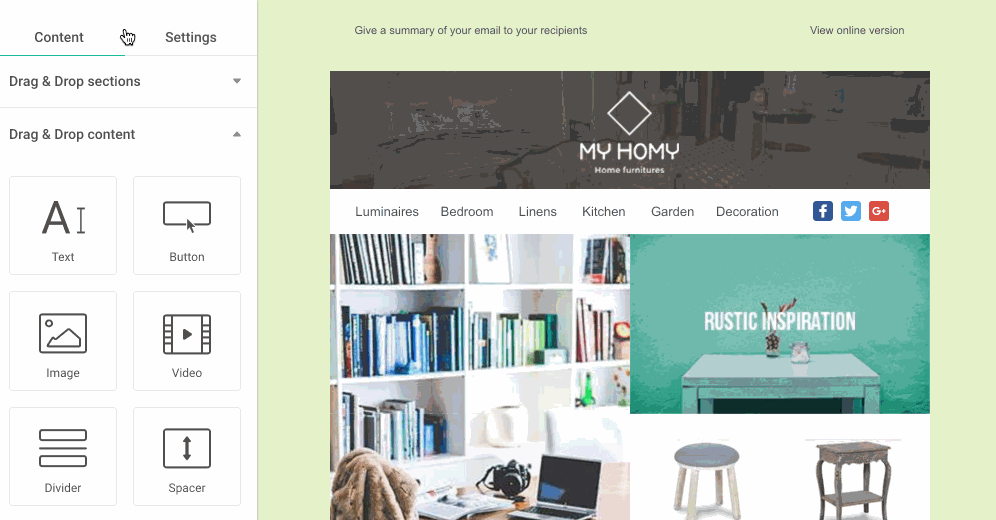
Content Tools
This area covers all the content elements that will appear in your message (text, images, buttons, social sharing, etc).
Adding content is easy - just click on the content block and drag it to the desired area in your campaign. If you want to move that block, just drag and drop to the new location.
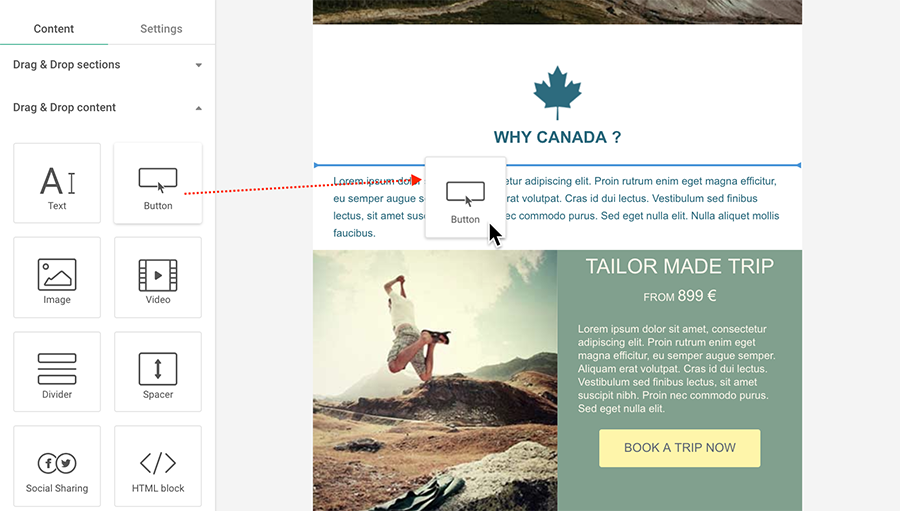
Click within the frame to customize the element using the toolbar that appears around the frame.
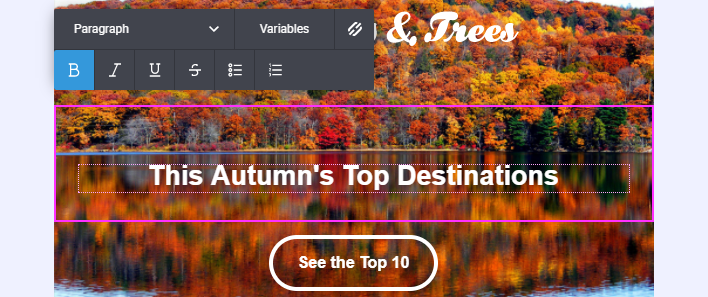
Text

Using the Text toolbar, you can easily format and customize your text block:
o Adjust line heights
o Align text
o Set the background color
o Change Margins
o Personalize your content using contact properties
o Format your text (font, bold, italic, etc)
AI Assistant
The AI Assistant (ChatGPT powered) is seamlessly integrated into the Email Editor to supercharge your content creation process. Craft compelling email copy effortlessly by leveraging artificial intelligence (AI) capabilities. Provide a campaign-specific prompt, and refine the generated content to suit your marketing goals. Elevate your email marketing with the innovation of AI!
For more details on how to use this feature, take a look at our AI Assistant documentation.
Image / Image Gallery

The Image toolbar offers a range of options to enhance your visuals:
-
- Adjust horizontal positioning
- Add padding for a polished look
- Apply a border or shape to the image
- Optimize for mobile scaling
- Set a background color for seamless integration
You can incorporate an image into your section using the following methods:
- Upload: Select an image from your device and effortlessly add it to your Image Gallery.
- Image Gallery: Choose from your existing collection of images stored in the Image Gallery for quick selection and use.
- Link: Directly use an existing image available online.
The Image Gallery feature in Mailjet serves as a centralized hub for managing and organizing images to be used in your newsletters. For more details, please check the following article.
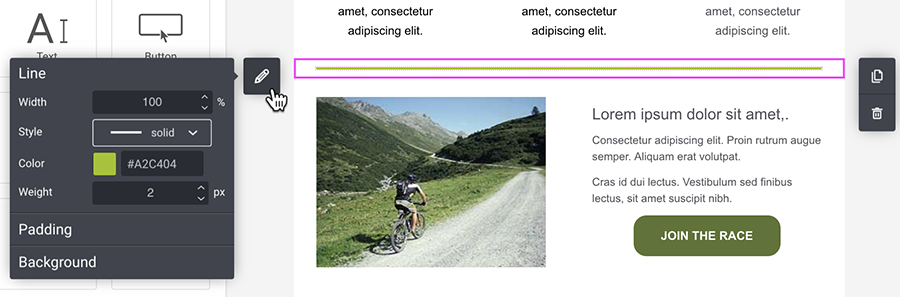
Divider

You can add a dividing line to separate sections or elements within a section (as per the example below). The Divider toolbar allows you to:
o Set the background color
o Change Margins
o Format the line (design, color, weight)
o Adjust the horizontal and vertical spacing
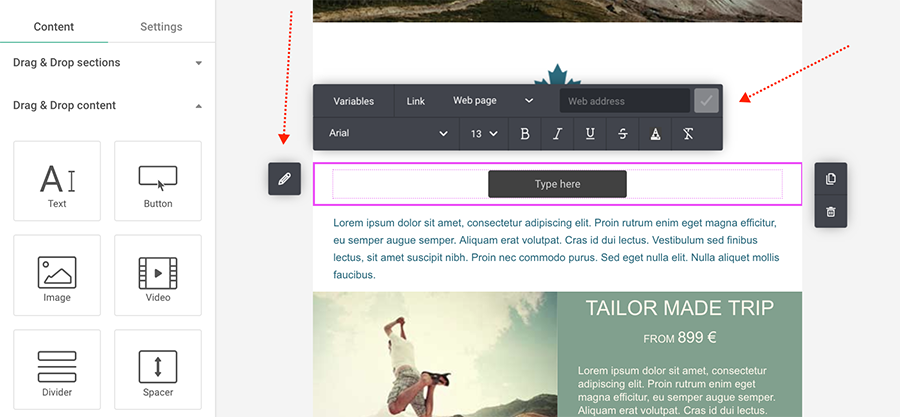
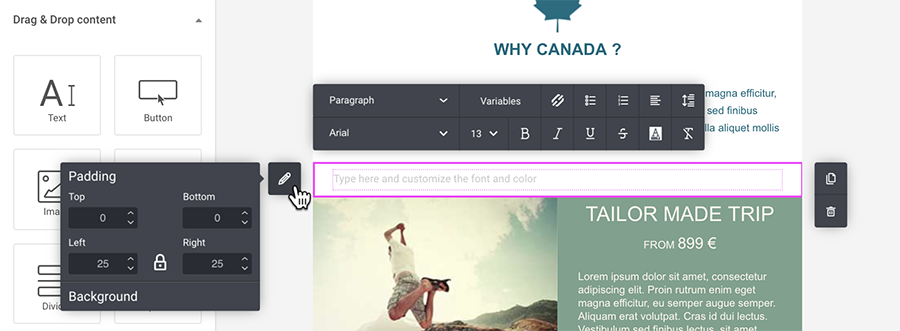
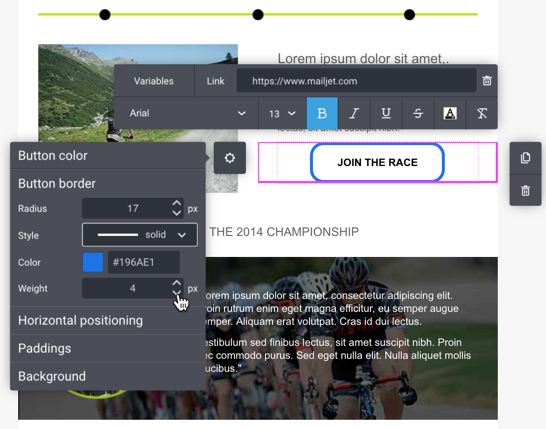
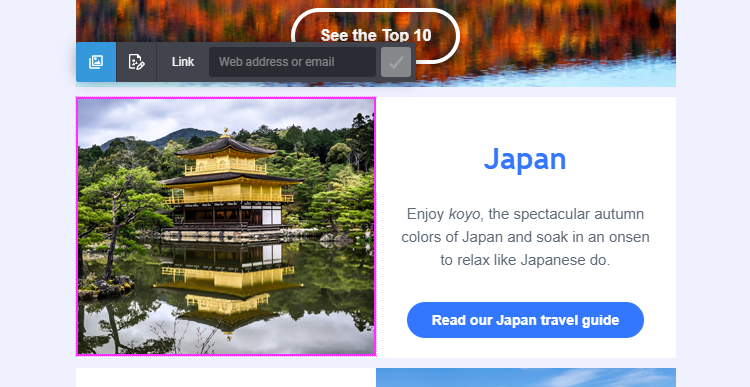
Button

There are many options available in the Button toolbar including:
o Border Radius (set the roundness of the button corners)
o Button border color, weight, and style (solid, dotted, dashed, etc)
o Set horizontal positioning and padding
o Add a hyperlink
o Font alignment
o Adjust the margins
o Personalize the text using contact properties
o Format the font (font family, color, bold, etc).
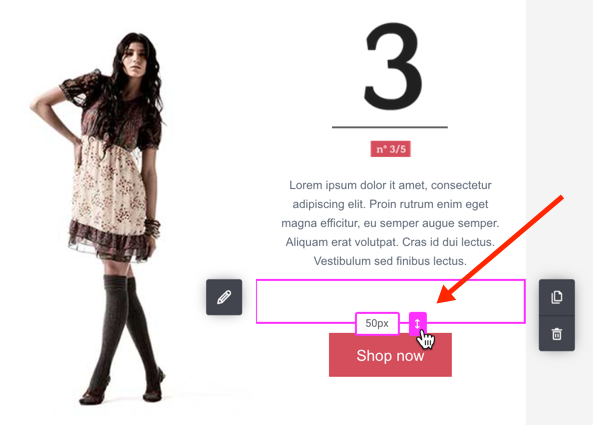
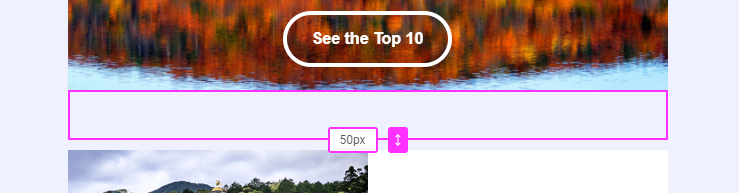
Spacer

Add a blank space to separate elements or sections within your newsletter. With the Spacer Tool, you can:
o Set the height of the blank space (in pixels)
o Add a background color (optional)
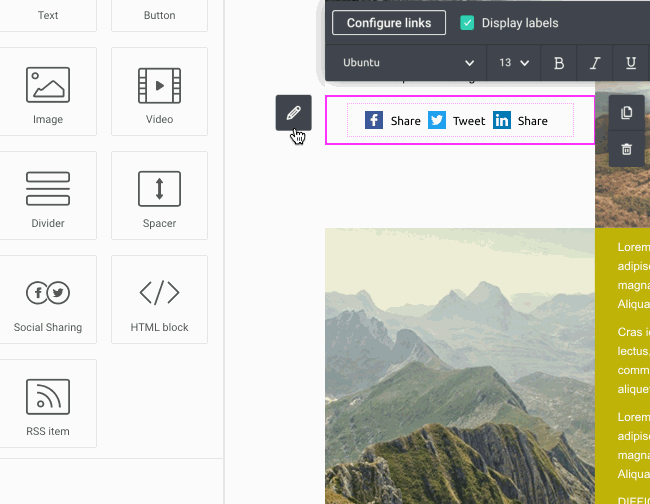
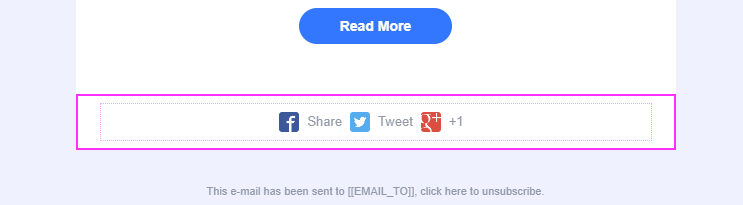
Social Sharing

Add your favorite social icons to your campaign such as Facebook, Twitter, LinkedIn, Instagram, YouTube, Medium and Xing.
Click the 'Configure links' button to open the Social Media Configuration modal where you can:
• Select up to 10 social media icons
• Modify the label text
• Share the online version of your marketing newsletter to your social media account* or set the link to go directly to your social media page.
• Create your own social icon by clicking 'Add custom icon'
To show and configure the text labels, click 'Display labels'.
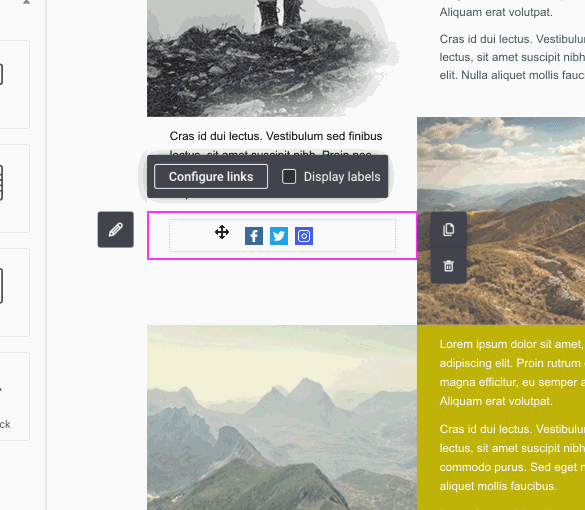
* The online sharing option is currently available for marketing campaigns, and not for transactional and automation emails.
Click the block options (pencil) to configure the icon size, shapes and color as well as the section background color and padding.
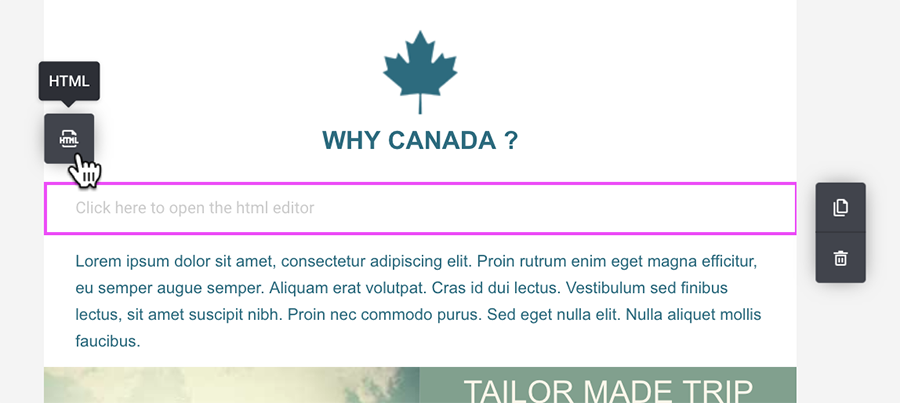
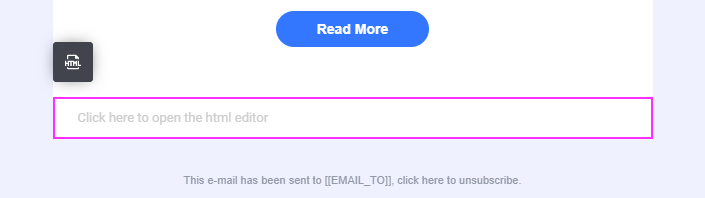
HTML Block

You can add some HTML code directly into your newsletter. Drag the HTML Block to your campaign, then click on the button from the toolbar to open the HTML editor window and code away!
RSS Feed

Pull blog posts and other dynamic content into your campaigns with an RSS Feed.
Simply drag the RSS Feed tool to your campaign and add your RSS Feed URL link in the modal window. Then select the items you want imported by clicking on the drop-down list or searching by author or title.
Each imported item will appear as a section in your campaign where you can edit the content and image as normal.
The RSS content is retrieved only once upon import and will not be updated automatically. If you need to update your RSS content, just create a new RSS feed and delete the old one.
Every time you add an URL link to an RSS Feed, it will be stored locally at API Key level. The next time you add an RSS Feed content block to a campaign, you will have access to the last 5 feeds added.
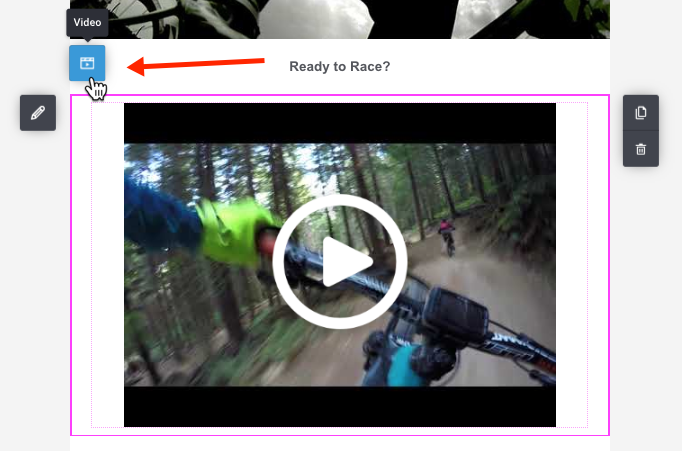
Video

To add a video to your campaign, drag the Video tool to the desired location. In the popup modal, add your video URL.
Preview images are automatically generated for YouTube, Vimeo and Dailymotion videos. For all other videos, click ‘Choose image’ to add your own preview image.
Once the preview thumbnail is created, the default play button will be added. You can choose from several designs for the play button.
The last step is to add a simple description of the preview image in the ‘Image Alt Text’ field. This alt text will be displayed in the event your subscriber cannot view the image. Then click ‘Save Video’.
From the Video toolbar, click the ‘Video’ button to edit your video at any time.
Countdown Timer
Use the Countdown Timer block to add a real-time countdown to your emails — perfect for limited-time promotions, product launches, or event reminders. The timer is rendered as an image to ensure consistent display across all email clients. Once it reaches the specified end time, it will automatically stop and display 00:00:00:00.
To insert a countdown timer, open the Content panel and drag the Countdown Timer block into your template.
Configuration Options
End date and timezone
Set the exact date and time for when the countdown should reach zero. You can also select a specific timezone from the dropdown menu.
- The default timezone is based on your account settings.
- The dropdown includes commonly used timezones such as UTC, EST, PST, and more.
Digit display settings
Customize the appearance of your countdown timer digits using the following options:
-
Show/hide individual units
Choose which time units to display: days, hours, minutes, and seconds. -
Leading zeroes
Enable or disable leading zeroes (e.g.,04vs4). -
Digit spacing
Adjust the spacing between each time unit block (e.g., 10px). -
Digit separator
Select how the units are separated:- None (default)
-
Colon
: -
Hyphen
- -
Pipe
|
-
Digit color
Define the font color for the countdown numbers using a hex value or the color picker. -
Font family
The timer supports only web-safe fonts to ensure maximum compatibility. The dropdown includes fonts like:- Arial
- Verdana
- Tahoma
- Georgia
- Helvetica
- Times New Roman
-
Background color
Set the background color behind each digit block to improve readability and match your design style.
Timer labels
Toggle whether unit labels (e.g., Days, Hours, Minutes, Seconds) are shown below the digits.
- Default: Labels are shown
- You can also customize:
- Change the font style using the dropdown menu (web-safe fonts only)
- Adjust the Label color
Padding and Borders
You can customize the spacing and border of your Countdown Timer block for better alignment and visual appeal.
Padding
Use the Padding settings to control the space inside the block (between the content and its edges).
You can adjust the padding individually for each side:
- Top
- Bottom
- Left
- Right
Click the 🔒 lock icon to link or unlink the values for symmetrical spacing.
Borders
In the Borders section, you can define the border weight to add an outline around the Countdown Timer.
- Set the weight to
0for no border, or increase it to add thickness.
These options help you fine-tune spacing and layout for a polished design.
Brand Kit Logo Component
We’ve added a new "Logo" component to the email builder, making it even easier to integrate your logo into your templates.
Key Features:
-
If you have a Brand Kit with a saved logo, a Logo component with a preview of your logo will appear in your builder.
- Simply drag and drop the logo into your template.
- The logo behaves similarly to an image block but:
- It’s centered by default.
- It doesn’t have the standard image toolbar, simplifying its behavior.
- It will automatically adjust to the background color:
- Light background → light logo variant.
- Dark background → dark logo variant.
- Logo Redirect URL (if set in the Brand Kit) will automatically be applied to the logo.
Behavior When No Logo Is Available:
- If your Brand Kit doesn’t have a logo, the Logo component will be hidden in the builder.
- If a logo is deleted from the Brand Kit, the Logo component will no longer appear.
Managing Existing Templates:
- Logos already placed in templates will not be removed, even if you update or delete logos from your Brand Kit.
- If you replace a logo in the Brand Kit, previously created templates will retain the old logo.
- If you duplicate a template, the logo will be preserved in the duplicated version.
- If you delete a logo and later upload a new one, you must manually reinsert the new logo into your templates.
Sections
Add a Section to Your Campaign
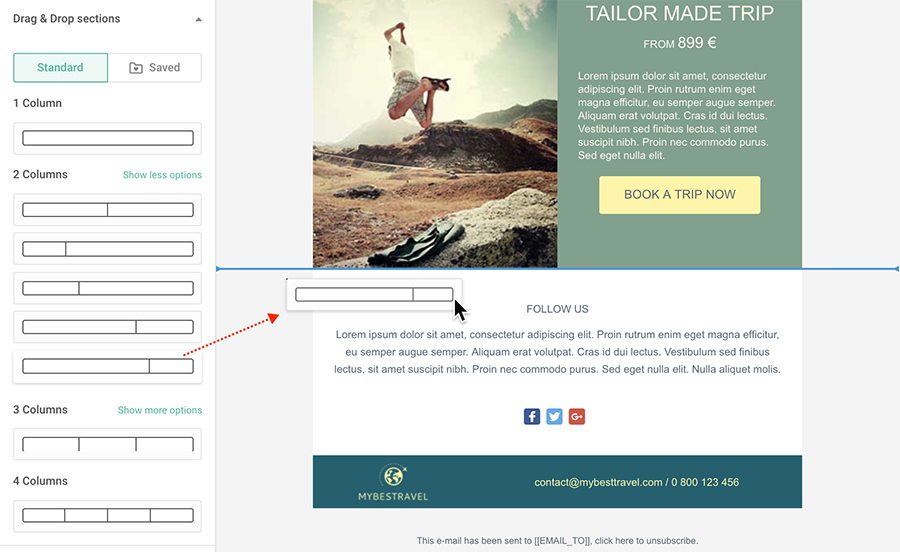
You can build your campaign by adding sections. Then you add different elements (text, button, images, …) to each section. A section can have 1, 2, 3 or 4 columns, with varying widths.
Click on the section layout you want, then drag and drop it into your campaign.
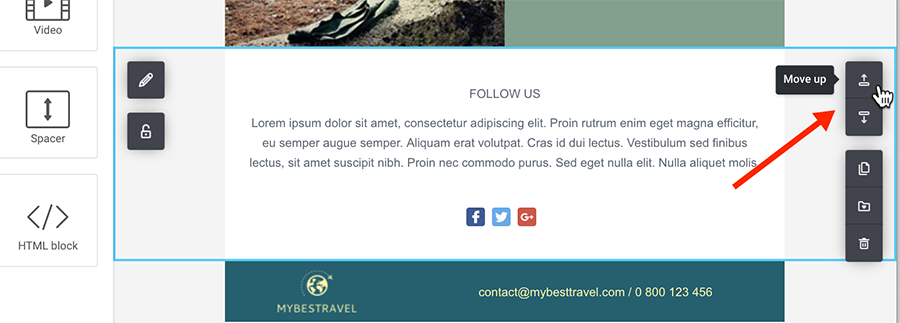
Move a Section
Click in the section background then on the up or down arrows.
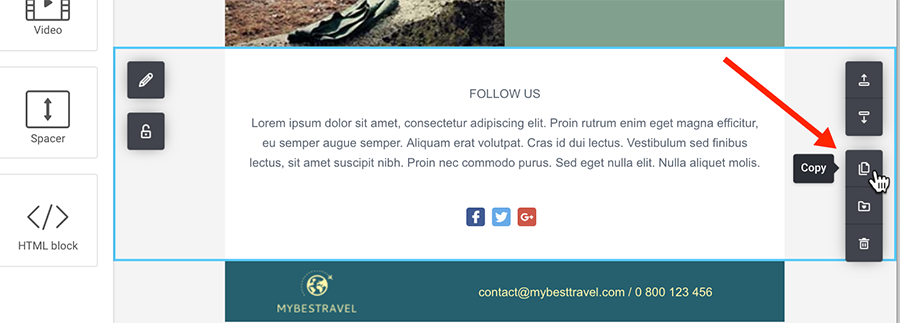
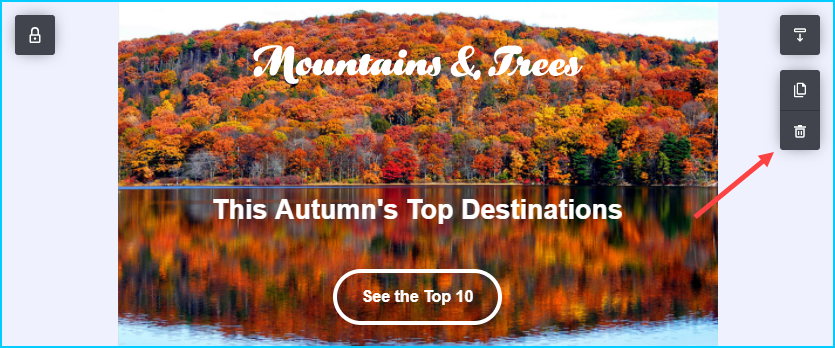
Duplicate a Section
Click within the section to highlight it, then click the duplicate icon on the right side of the screen.
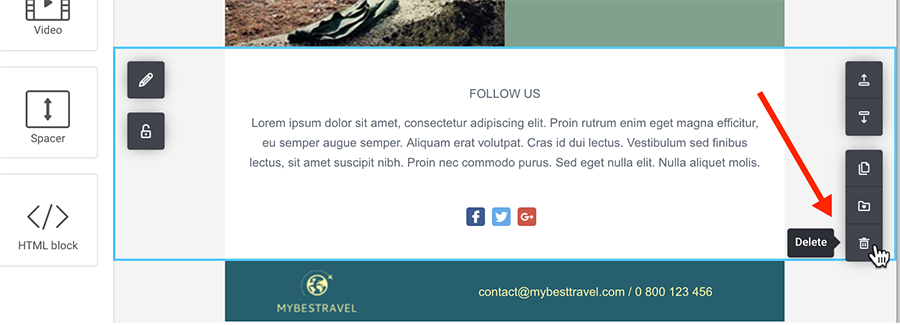
Delete a Section
To remove a section from your campaign body, click within the section, then click the trash icon. Confirm the deletion by clicking on the red 'x' that appears.
You can also quickly delete a section or element, by dragging it to the content tools area.
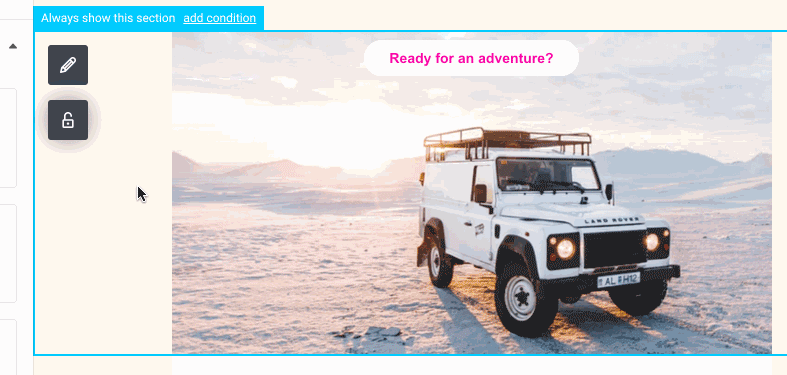
Conditional Sections
You have the option to display a content section to certain people by applying a segment. The segment can be based on the user’s existing contact properties or by their user activity.
For example, you may want to display a promotional section to your female clients only or offer a discount code to clients who have not opened your previous newsletters in the last 3 months.
Please take a few minutes to review your current segments. If you need a refresher, please review our Segmentation Guide.
Click within a section to view its current conditional status. By default, all sections are shown to everyone.
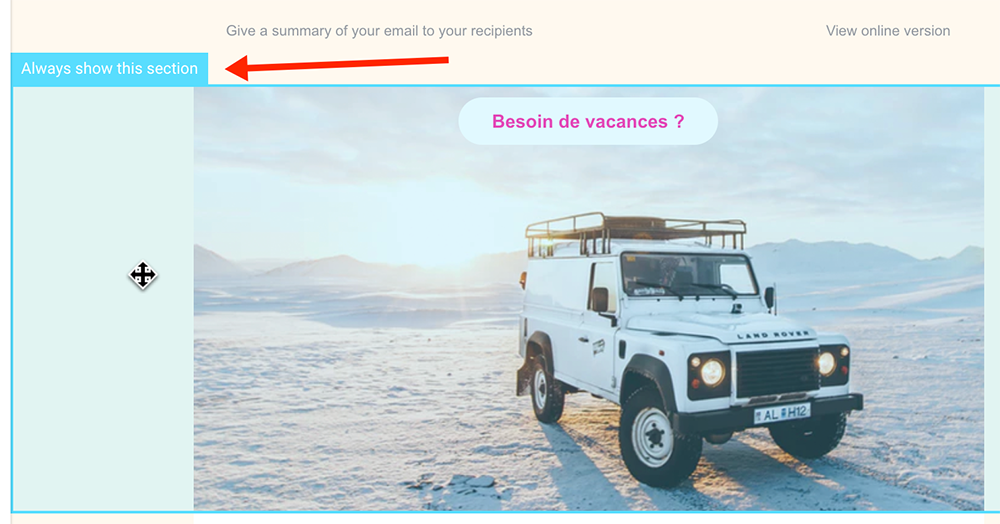
To apply a segment:
- Click 'Add Condition'
- Click 'Only show to recipients who belong to the segment' and select a segment from the dropdown list.
- Click 'Save'
To remove a segment, simply click 'Edit' and select 'Show to all recipients'.
Pre-built Sections
A pre-built section can serve as a template that can be used and modified to meet the specific needs of the sender. Think of a pre-built section as a ready-made content block that provides a foundation for creating various types of emails or designs. This section already includes a combination of elements such as text, images, headings, buttons, and more, arranged in a visually appealing and coherent manner.
The primary reasons for using pre-built sections in a template are as follows:
- Time-Saving: Starting with a pre-built section saves time as it provides a starting point, reducing the need to create content or design from scratch.
- Design Consistency: Using a pre-built section ensures a consistent and professional look throughout the template. This consistency is crucial for brand identity and recognition.
- Structure and Layout: Pre-built sections offer a well-organized structure and layout, guiding the sender on how to present their content effectively.
- User-Friendly: Pre-built sections are designed to be user-friendly, allowing even those with limited design skills to create visually appealing templates.
- Customization: While the pre-built section provides a foundation, the sender can easily modify, rearrange, or add elements to tailor the template to their specific requirements.
- Flexibility: Senders can adjust fonts, colors, images, and other visual elements to align with their brand or style preferences.
- Consolidation of Best Practices: Pre-built sections are often created based on design best practices, ensuring the template adheres to effective design principles.
- Reusability: Once a pre-built section is modified to the sender's needs, it can be saved and reused as a personalized template for future use.
By using a pre-built section in a template and customizing it according to your needs, you can create visually appealing and well-structured emails or designs without the burden of starting from scratch. This flexibility empowers the sender to focus on their content and messaging while leveraging professionally designed elements to enhance the overall quality and impact of their communications.
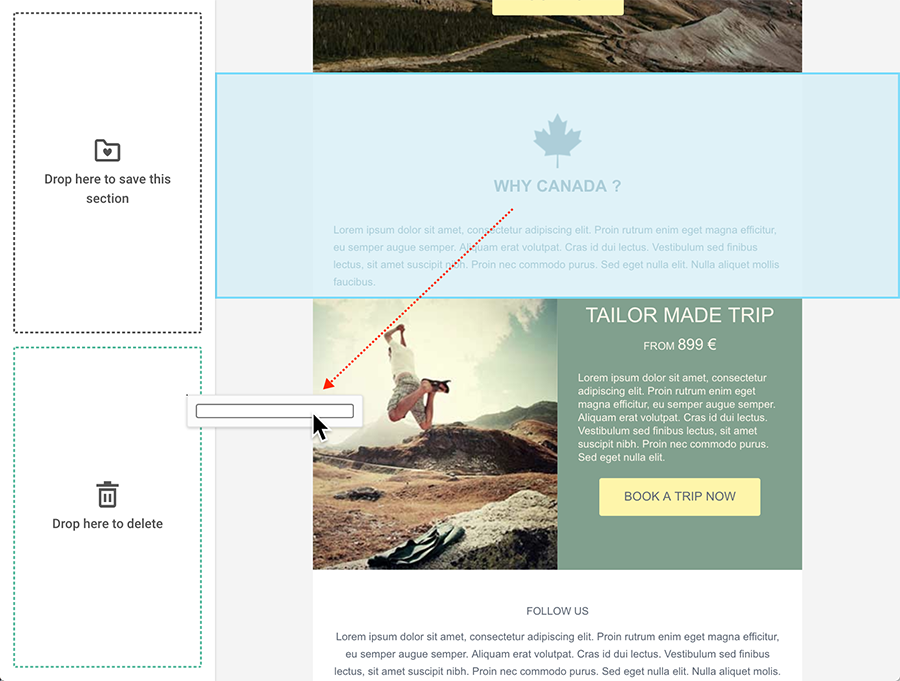
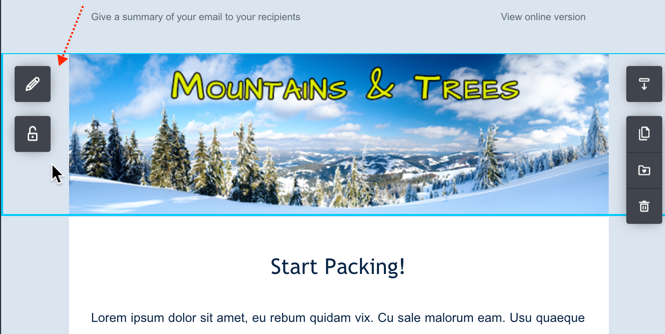
Saved Sections
Tired of creating and updating the same header, footer or key sections in your campaigns and templates?
You can stop duplicating your efforts and start saving your important campaign/template sections with Saved Sections.
Saved Sections allows you to save a part of your campaign or template (content, color, formatting) for use in your future Marketing, Transactional and Automation mailings.
All sections are saved into a Saved Sections Gallery where you can :
- Save your sections from the Email Editor to a Saved Section gallery
- Drop a saved section into a template or dynamically link* a section to many templates at once
- Work on draft versions to update sections without impacting the templates they are linked to
- Edit and publish changes to your sections, updating all templates they are linked to, with a single push of a button!
* The Dynamically Linked Saved Sections feature is only available on our Premium Plans.
Regular vs Dynamically Linked
There are two types of Saved Sections:
-
Regular Saved Section
Copy your Saved Section to your template or campaign. Any changes made to Saved Section in the Gallery will not be reflected in your template. -
Dynamically Linked Saved Section (Premium Feature)
Link your Saved Section to your templates. When changes are published on a Linked Saved Section in the Gallery, all linked templates are automatically updated. Use the Link mode for sections that are used in many of your templates such as headers and footers.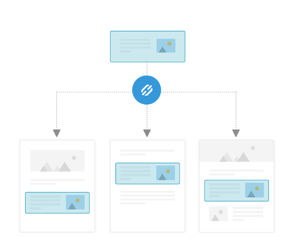
Draft Sections and Published Sections
A Saved Section can be in Draft mode or in Published mode:
- Only Published Sections will appear in the 'My Saved Sections' menu in the Email Editor and can be added to your marketing template, transactional email, or included in an automated workflow.
- A Draft Section cannot be used in templates and will not appear in the 'My Saved Sections' menu in the Email Editor when designing your campaigns, templates, or automated workflows. Once you are satisfied with your section design and content, simply publish it to have it appear in 'My Saved Sections' in the Email Editor.
Section statuses can be seen in the Templates → Saved Section Gallery.
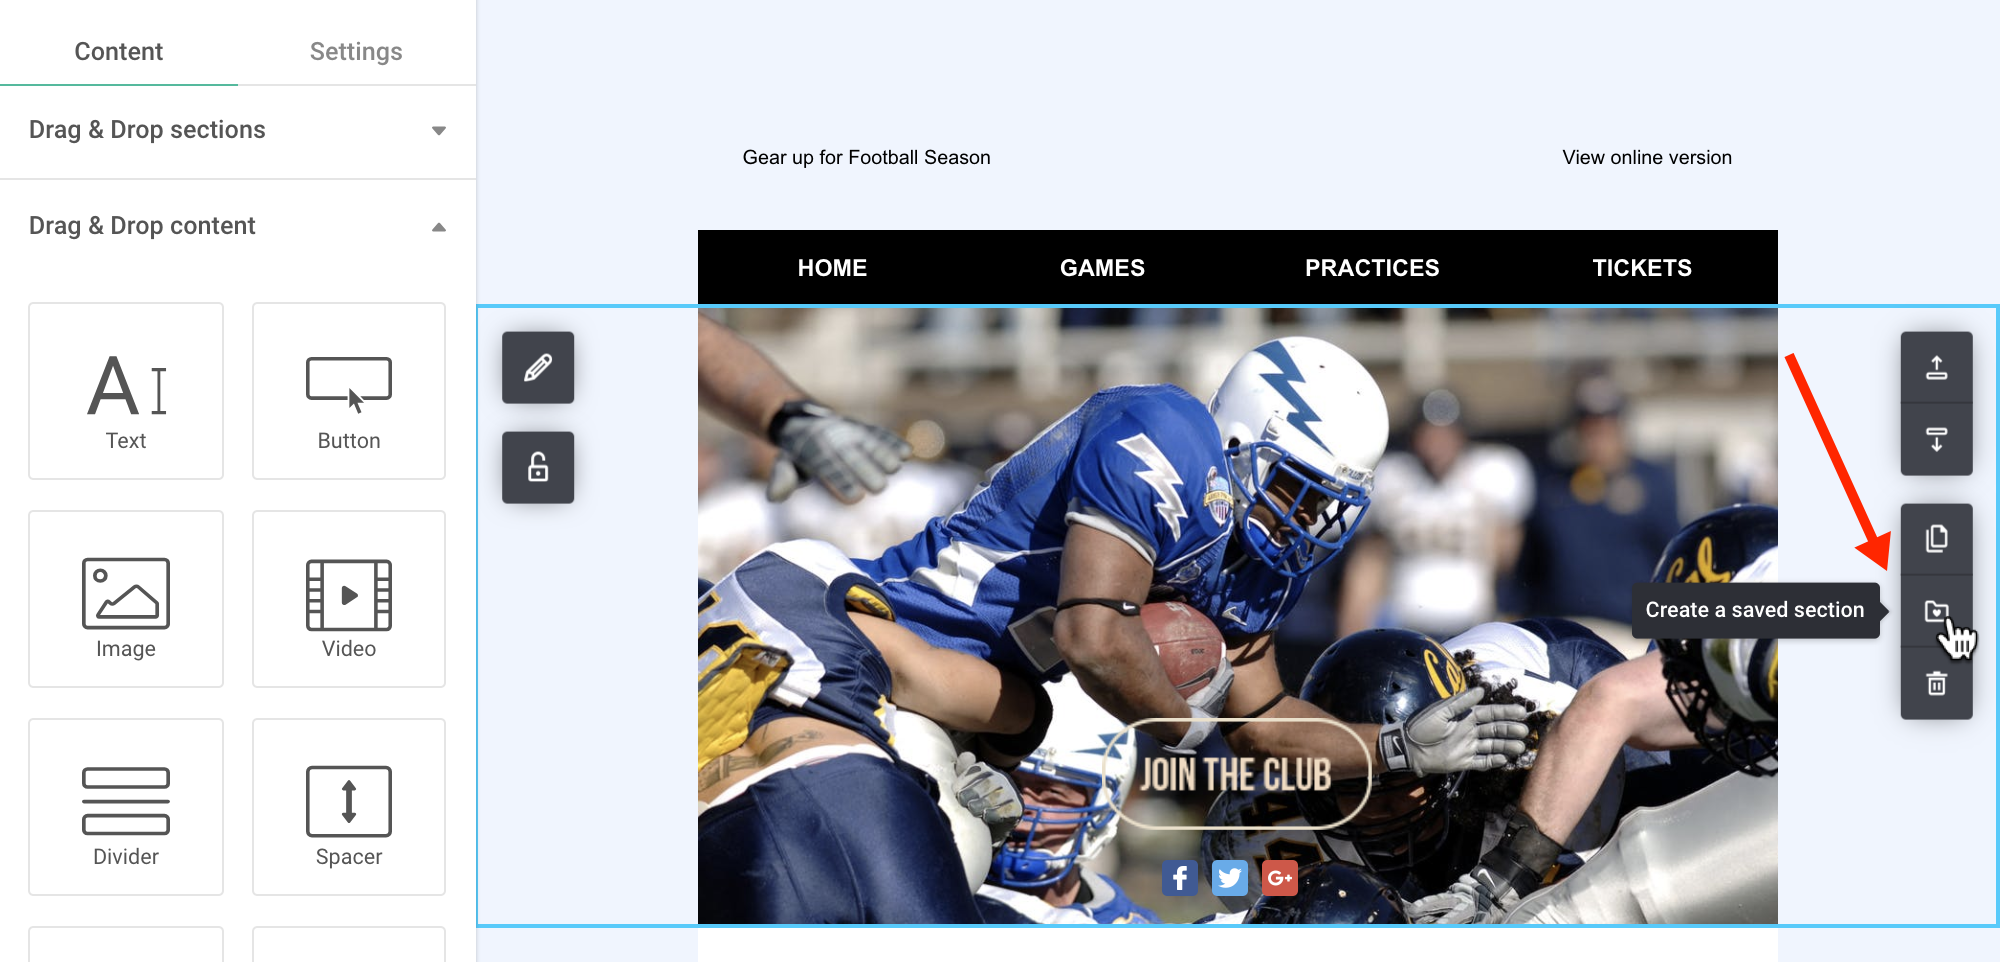
Create a Saved Section
There are two ways to create a new Saved Section:
- Use the Section Builder to design a new section
- Save a section from an existing template or campaign via the Email Editor
Using the Section Builder from the Saved Sections Gallery
Go to your Saved Sections Gallery which can be accessed from any Templates page.
To design a new section, click on 'Create a saved section'.
Enter a name for your new Saved Section, an (optional) description and then click 'Create' to continue.
Design your new section using the Section Builder, which is a mini version of the Email Editor.
Once your section is ready for use, just click on 'Save & Publish to gallery'.
And that's it - your first section has been published.
Click 'Back to my sections' to return to the Saved Sections Gallery to see your newly published section. It can now be used in your campaigns, transactional emails and automation workflows. :)
Keep reading to learn how to create a section from an existing template/campaign in Mailjet’s Email Editor, or jump to how to use My Saved Sections.
From an existing Campaign / Template via Mailjet’s Email Editor
You can also create a Saved Section from an existing Campaign or Template. Within the Email Editor, select the section that you want to save, then click on 'Create a saved section' from the menu.
In the pop-up window, enter a name for your saved section and (optional) description.
Alternatively, you can also quickly save a section by dragging it to the Content Tools area, on the left of the builder.
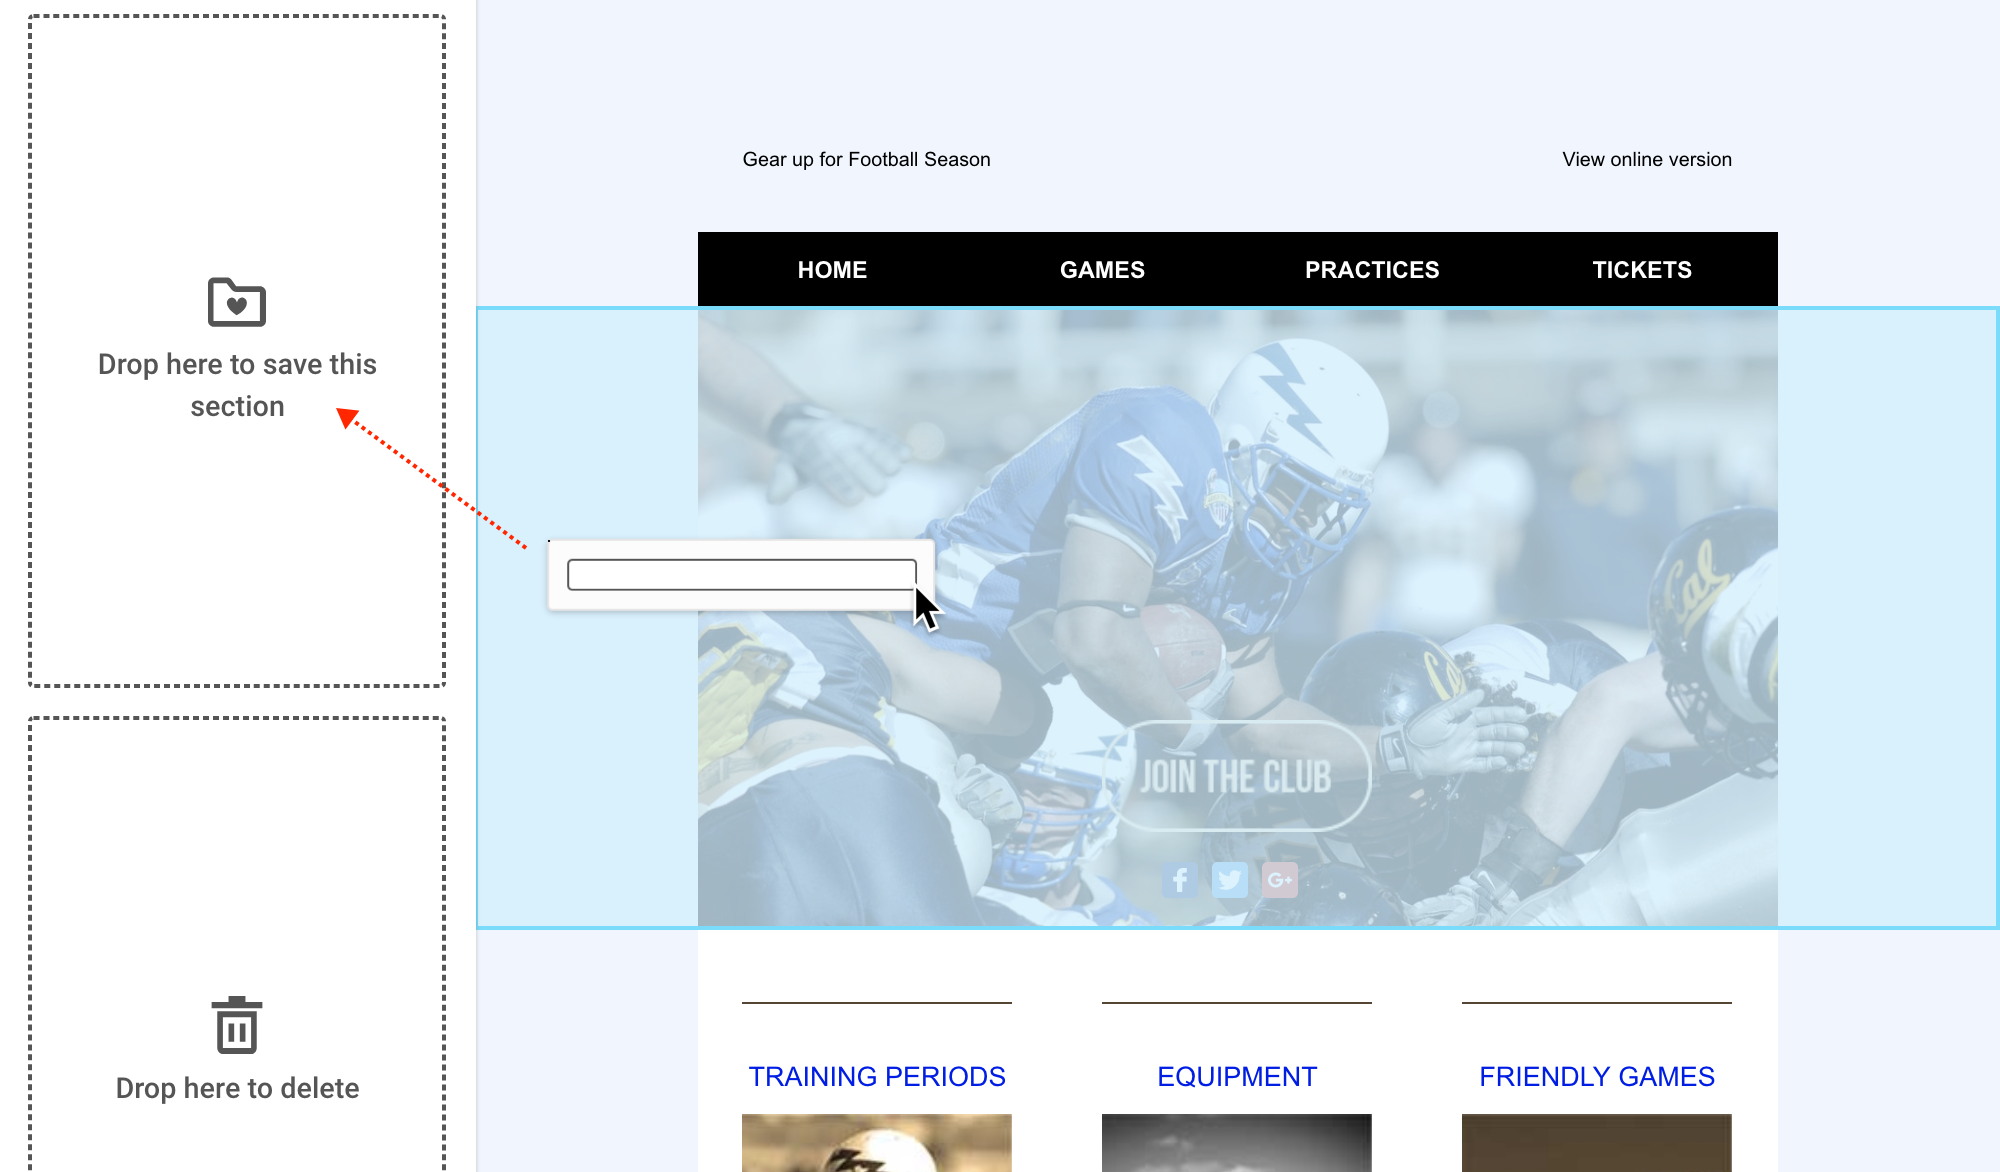
Once you choose the name and click on 'Save', the section will be added to your Saved Sections Gallery. And it will also be automatically linked to the template you created it from (Premium Feature only). If you are on a Free or Essential Plan, or saved the section from a campaign, no link will be made.
Using Saved Sections in Mailjet’s Email Editor
You can view and insert your Saved Sections from the Email Editor.
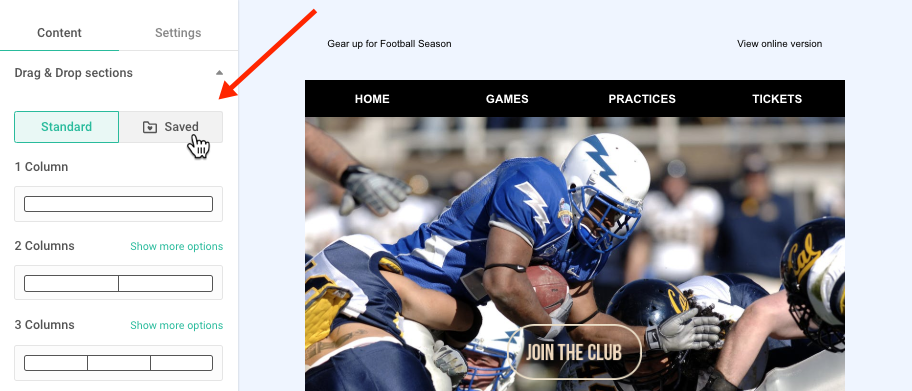
Insert a Saved Section into a Campaign (Regular Mode only)
Saved Sections can only be copied as a regular section into your marketing campaigns, with no link to the Saved Section Gallery. Any changes made to the section in your campaign are local only (Dynamically Linked Sections can only be added to a template and will be covered in the next part of this guide).
To insert a section into your marketing campaign, click on Drag & Drop Sections → Saved and drag-and-drop a section into the campaign.
Insert a Saved Section into a Template (Regular or Linked Mode)
With templates (marketing, transactional, automated), Saved Sections can be copied in as a regular section, or as a dynamically linked section (Premium Plans only).
Click 'My Saved Sections' to view all your currently published sections. Then simply drag-and-drop the desired section into your template.
If you are on a Free or Essential Plan, the Saved Section can only be copied as a regular section into your template.
For Premium Plan Users, the Saved Section will automatically be added to your template as a Dynamically Linked Section.
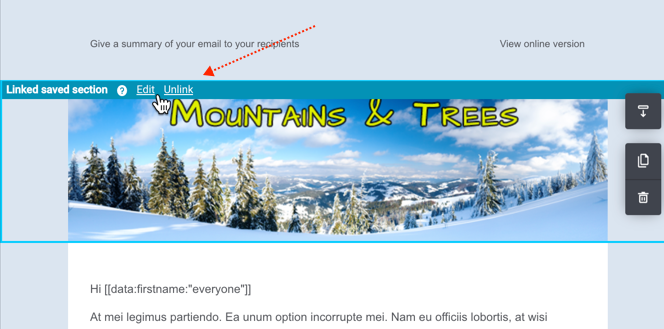
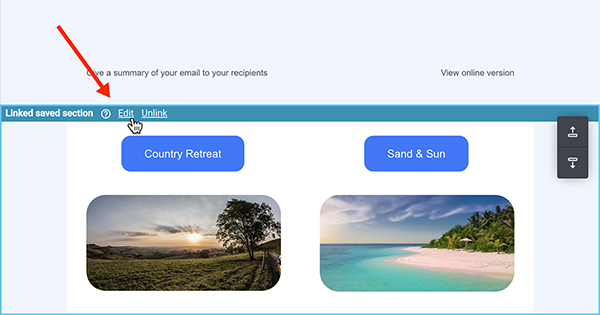
Unlink a Linked Saved Section within a Template
Dynamically Linked Sections within a template can be unlinked and changed to a Regular Saved Section, allowing you to make changes to that specific template only.
To unlink a Saved Section within your template in the Email Editor, select the section and click on the 'Unlink' option.

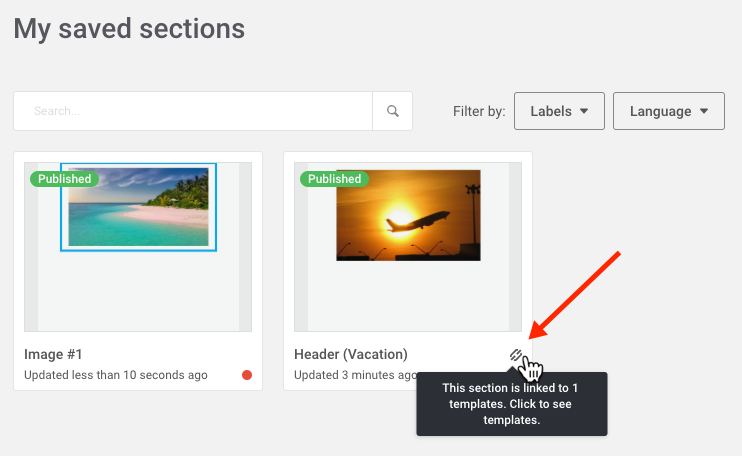
My Saved Sections Gallery
All your sections will be saved to the Saved Section Gallery, which can be accessed from within any Template Gallery (Marketing, Transactional, or Automation). Simply click on 'Saved Sections' from within a Template Gallery.
Saved sections that are dynamically linked to a template have a link icon. Click on the link icon to view the template list.
Export a Saved Section
Your Saved Sections can be exported to the Saved Sections Gallery of a subaccount of your choice by selecting Options → Export.
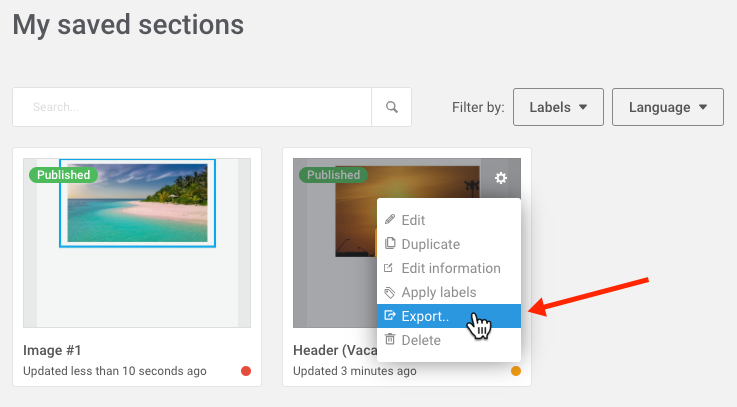
If you export a Dynamically Linked Section, the linked references will be removed. An exported section will be saved as a Draft in the respective subaccount's Saved Sections Gallery.
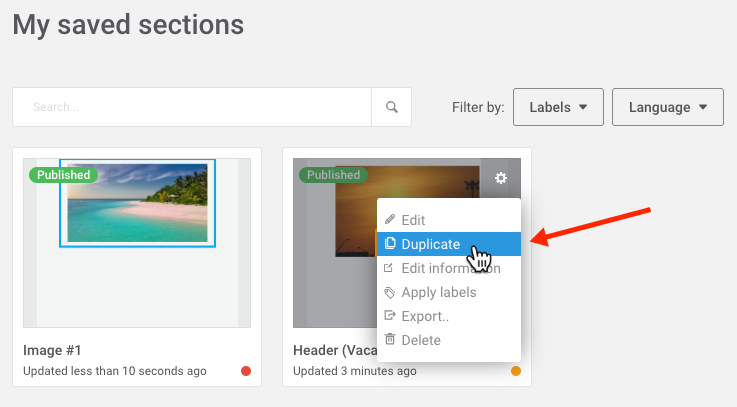
Duplicate a Saved Section
To duplicate a saved section, simply select Options → Duplicate.
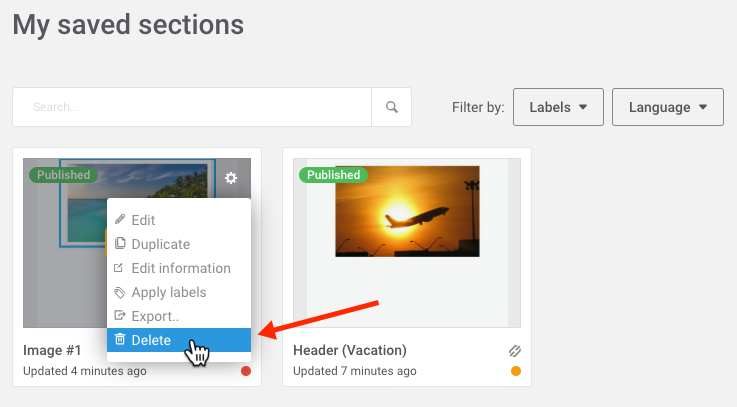
Delete a Saved Section
A saved section can only be deleted if it is not currently linked to any templates.
If a section is dynamically linked, you will need to go to each template and unlink the saved section. To view which templates are linked to a saved section, click on the 'link' icon.

To delete an unlinked section, click on Options → Delete.
Apply & Remove Labels to a Saved Section
Use labels to better organize and manage all your saved sections in the Gallery.
For example, use labels to identify section types (header, footer, social media), themes (holidays, locations, client groups), and much more.
Apply and remove labels for any saved section in the gallery by selecting Options → Apply Labels.
For detailed information on how to create, edit, and delete labels please visit the Label Management Section in our Template Management Guide.
Edit Existing Saved Sections
Edit a Saved Section in the Gallery
From your Saved Section Gallery, select Options → Edit
Make the section changes in the Section Builder, and then either save the changes as a Draft or Publish them.
Edit a Saved Section via Mailjet’s Email Editor
A Regular Saved Section in your campaign or template can be edited as normal within the Email Editor.
To edit a (Dynamically) Linked Section from the Email Editor, click on the 'Edit' option to be redirected to the Section Builder.
Make the changes to the section. Then save the changes as a Draft, or Publish the changes to have them propagate to all other linked templates.
Then click 'Return to my template' to go back to the Email Editor.
Dynamic Linked Sections and Downgrading from Premium Plan
If you create Dynamically Linked Sections while on a Premium Plan, and then downgrade to a Essential or Free Plan, the links between sections and templates will become dormant. And any changes made to an existing Linked Section will not be reflected in the linked templates.
If you upgrade again to a Premium Plan, the dormant links will become active again, and you are free to create new Linked Sections.
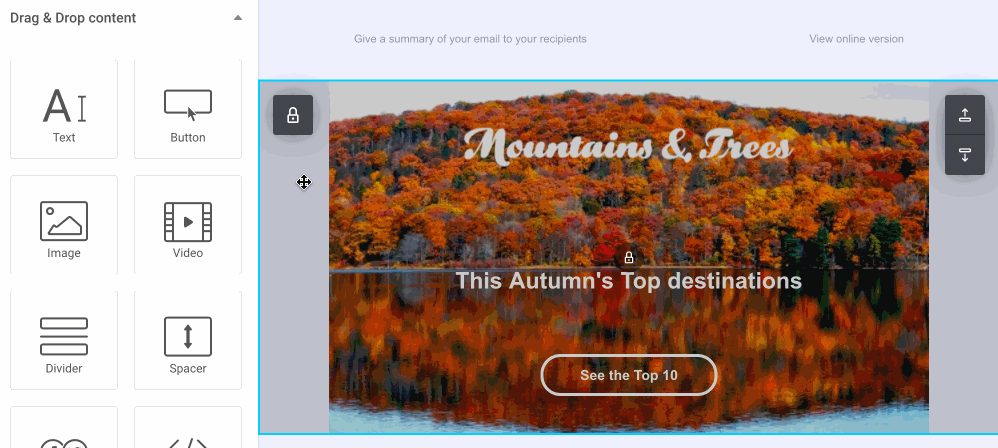
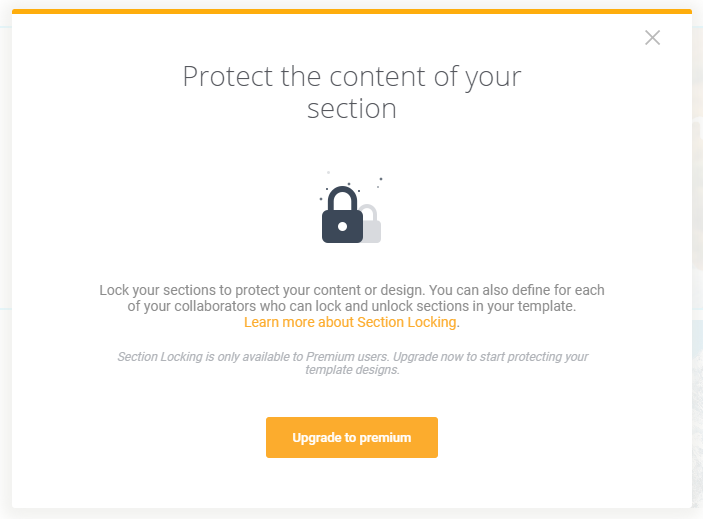
Locking a Section
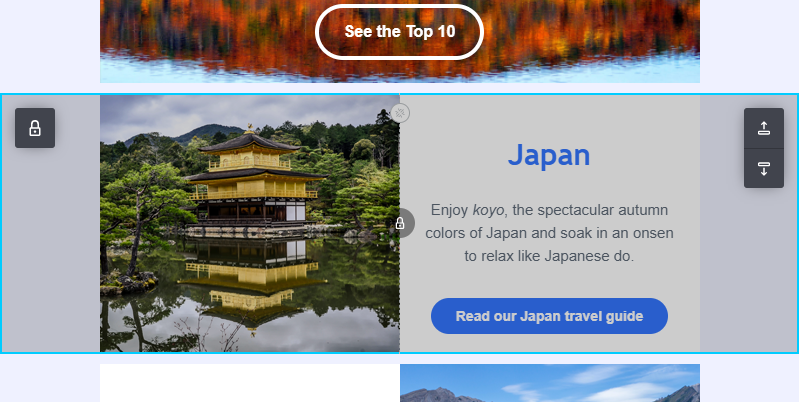
Protect your email design and brand identity from accidental changes with Section Locking.
Give your Developers, Designers and other team members the ability to control who can edit or delete content within individual sections of a Campaign or Template, as well as the entire Design & Layout.
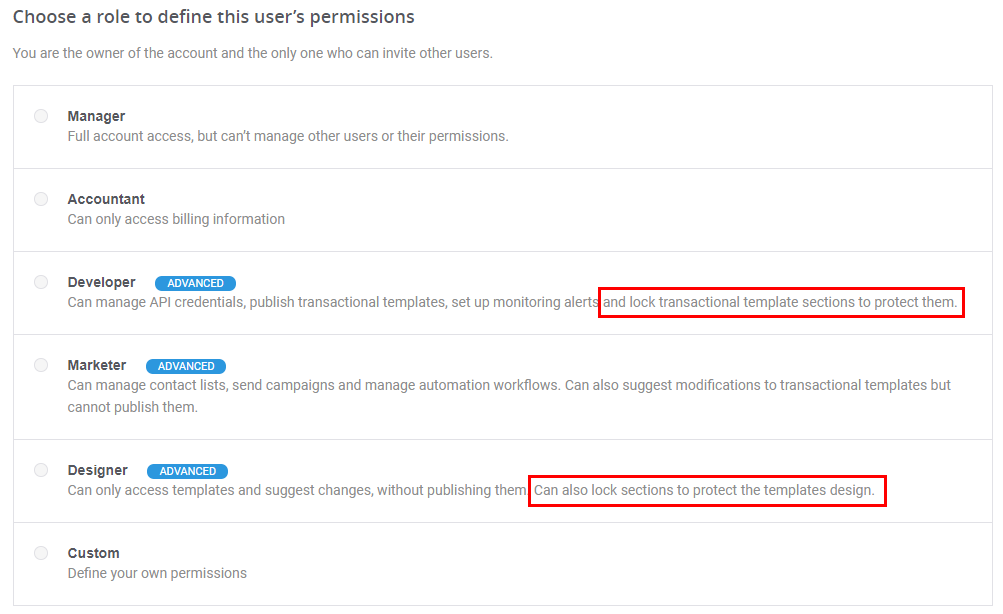
Assign Locking Permissions
Give locking permissions when sharing your account with collaborators and team members.
Choose the predefined role of Manager, Developer or Designer role which includes locking ability, or create a custom role. (For more information on User Roles, please go to the Account Sharing Guide)
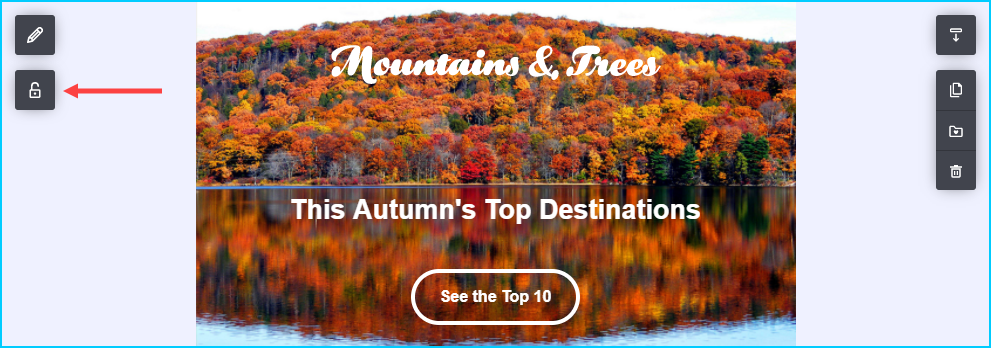
Locking a Section (via Mailjet’s Email Editor)
To lock or unlock a section of a campaign or template in the Email Editor, simply click on the 'Content Locking' icon.
If you do not have permission to lock or unlock a section, a modal will appear informing you to contact the account administrator to acquire the permissions.
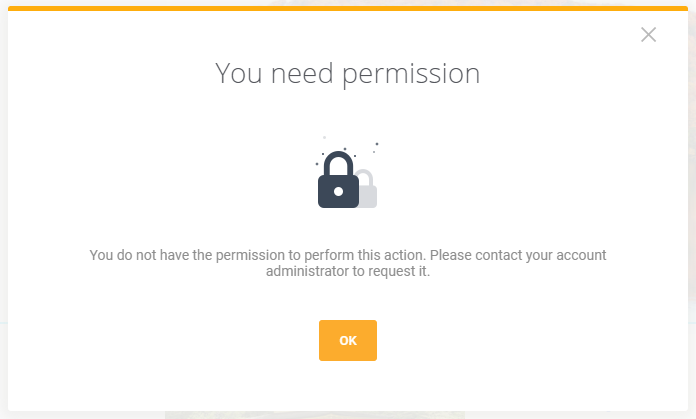
Or if you are on an Essential plan, you will need to upgrade to a Premium Plan.
If you have permissions, the 'Content Locking' modal will appear with the following levels of locking:
Unlock everything (default)
There is no locking and the section is completely open for modification, including deletion.
Allow text and images edition only
In other words, it is content-editable only. No changes to the section design (padding, alignments, colors, etc) can be done and no content blocks can be added or removed from the section. The section can be moved and, if checked, the section can be deleted or duplicated.
Lock everything.
The section is fully locked down and no changes can be made, except moving the section.
Once you selected a level of locking, click 'Confirm' to save your changes.
Viewing Locked Sections
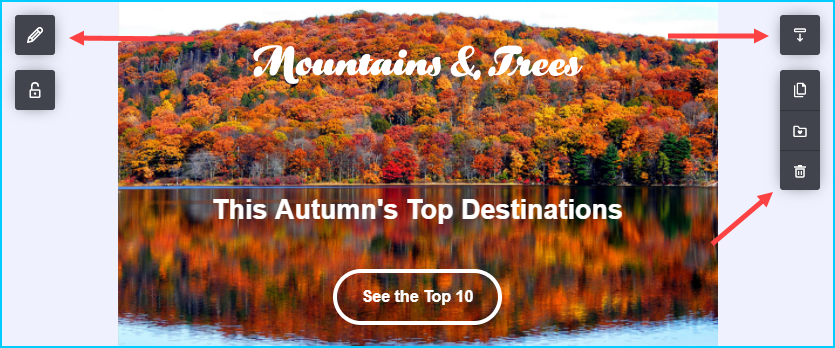
Let's look at how the different locked sections will appear in the Email Editor to users who do not have permissions to lock or unlock sections.
Unlocked Section
The section appears as normal in the Email Editor - with full content block menu icons and section buttons (section options, move up/down, copy, save section, delete).
Section is content-editable only (with no section deletion)
The section can moved; but all other section buttons are hidden (section options, copy, delete, save section).
Locked Section: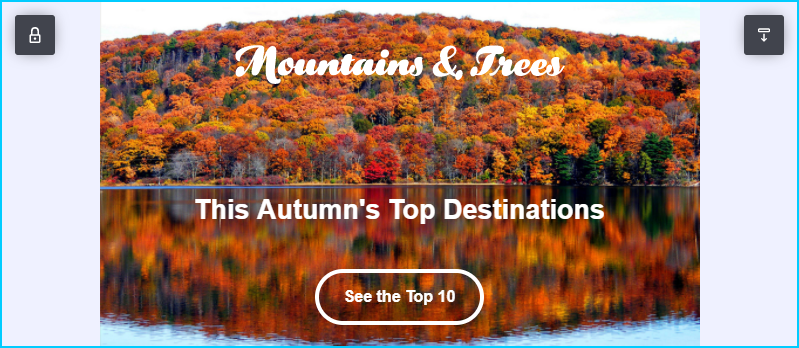
Not Locked Section:
And no content blocks can be added or deleted to a content-editable only (no deletion) section.
When clicking on a content block within a (locked) section, the options available will be for content editing. The icons associated with block design, or block duplicating or deletion will be hidden
Text
| Tools Available | Not Available |
|---|---|
| o Text style preset (Paragraph, Heading…) o Variables o Insert a link o Bulleted list o Numbered list o Bold, Italic, Underline, Strikethrough |
o Font Family, Font Size, Text Color o Clear Formatting o Alignment o Line Height o Block Options (padding, background) o Copy or Delete Text Block |
 | |
Image
| Tools Available | Not Available |
|---|---|
| o Choose Image o Edit Image o Enter Link |
o Block Options (padding, shape, etc.) o Copy or Delete Image Block |
 | |
Divider
| Tools Available | Not Available |
|---|---|
| o No Options | o Block Options (padding, shape, etc.) o Copy or Delete Divider |
 | |
Button
| Tools Available | Not Available |
|---|---|
| o Insert a variable o Enter Link |
o Font Family, Text Size, Text Color o Bold, Italic, Underline, Strikethrough o Clear Formatting o Alignment o Line Height o Block Options (button color, border, padding, etc.) o Copy or Delete Button |
 | |
Spacer
| Tools Available | Not Available |
|---|---|
| o Adjust Height | o Block Options (background color) o Duplicate or Delete Spacer |
 | |
Social Sharing
| Tools Available | Not Available |
|---|---|
| o No Options | o Font Family, Text Size, Text Color o Bold, Italic, Underline, Strikethrough o Clear Formatting o Alignment o Line Height o Block Options (icon styling, padding, configure links, etc.) o Copy or Delete Social Sharing Block |
 | |
HTML
| Tools Available | Not Available |
|---|---|
| o Enter HTML | o Copy or Delete of HTML Block |
 | |
Section is content-editable only (with section deletion)
With this locking option, you can duplicate or delete the section.
All options for the content blocks (text, image, button, etc) are the same as the "Section is content-editable - with no selection deletion" locking option.
Section fully locked
A section that is fully locked has no available options or menus. The section and any content blocks within, cannot be modified in any way but the section can be moved and saved.
Locking Global Page Design
Account owners and users who have locking permissions can lock the global design settings at the template level which includes:
• Page Layout (responsive design) and background color
• Text styles (headers, paragraphs, link styles)
• Logo Options
To access this locking option, go to the 'Settings' tab in the Email Editor, then click on 'Page design locking'.
The 'Page design locking' section offers two options:
• By default, the first option is selected which allows the Global settings to be modified by users with the permission to lock sections.
• Click the second option to lock all Global settings (except for Language). A small 'lock' icon will appear beside the locked options.
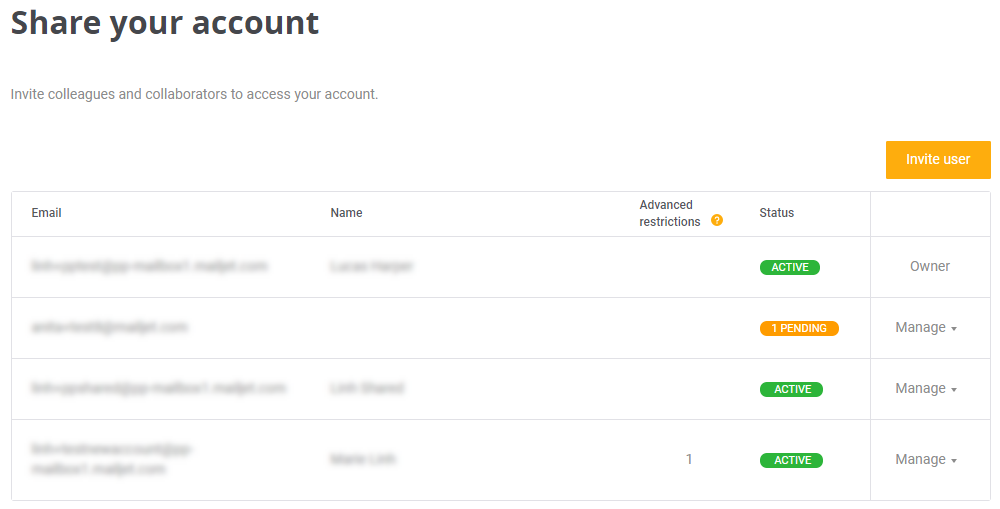
Real-time Collaboration
Real-time collaboration allows multiple users to simultaneously work on the same email template or campaign. This functionality enables teams to efficiently create, edit, and finalize email templates without the delays associated with sequential editing or exchanging drafts through email or other communication channels.
Key Features:
-
Simultaneous Editing
Multiple users can access and edit the email template at the same time. Changes made by one user are instantly visible to others, ensuring that all collaborators are working with the most up-to-date version of the template. -
Comments and Suggestions
Collaborators can leave comments or suggestions directly within the email template. This feature facilitates discussion and feedback within the template itself, reducing the need for external communication channels or lengthy email threads. -
Live Preview
A live preview allows collaborators to see how the email will appear to recipients as edits are made. This helps ensure that the final email template is visually appealing and functions as intended across different email clients and devices.
With the Real-time Collaboration feature, you can do just that – share your account with your team and have multiple people work in the Email Editor simultaneously!
Collaborating Users List
When two or more users are simultaneously working on a template in the Email Editor, each is represented by a colored circle displaying their initials. You can hover over any circle to see the user's full name.
Users Editing Sections & Blocks
The block or section being edited is highlighted in the color associated with the user making the changes, with their full name displayed within that area. You can also see the updates that other users are making in real-time.
Comments in real-time
You no longer have to wait for your colleagues to finish editing an email before you can review it. While a section is being edited, it will be temporarily locked, but you'll still be able to see the changes as they happen.
Additionally, the built-in commenting feature allows you to communicate effortlessly with your team directly within the email editor. This real-time collaboration streamlines the email design process, making it more agile and efficient.
Publishing a template
To avoid the accidental publication of incomplete templates, it is recommended that the primary account holder limit publishing permissions to specific users. This approach ensures that templates are only published after they have been reviewed and approved.
Collaborators can be granted access to create and edit templates, but not to publish them. This configuration allows the final publishing step to be managed exclusively by authorized individuals.
Header, Footer & Preview Text
The Header
The campaign header contains the two important elements:

-
Email Summary
To customize your email summary, simply click on the text, and make your changes.
-
View online Link
This link allows your recipient to view your email on a web browser. The link is automatically generated and no changes need to be made.
Preview Text
The preview text - also known as the preheader - is the text shown after the subject line when viewing your email in the inbox.
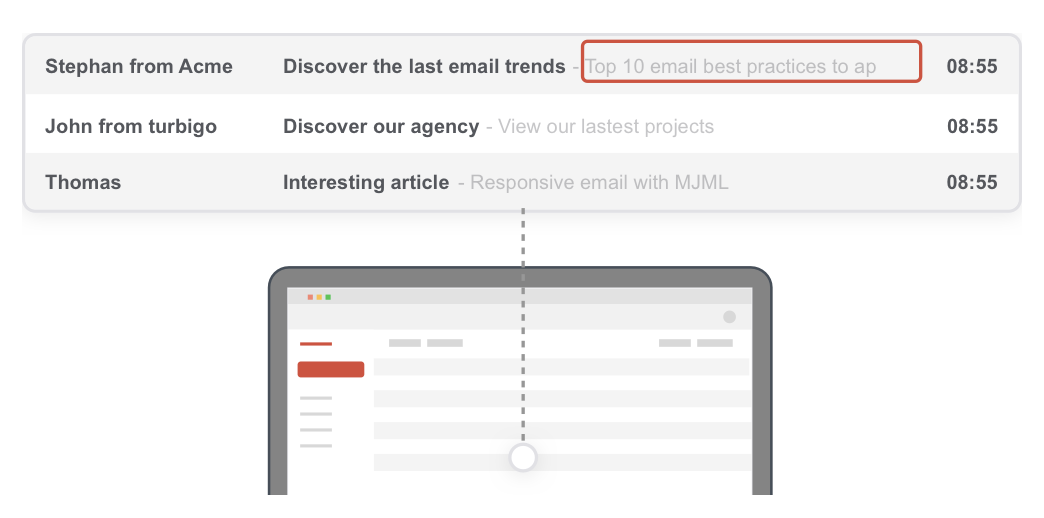
The preview text typically summarizes your email in a short sentence and can help your email get noticed in a crowded inbox.
To change the preview text, click the 'pencil icon' from the Email Editor design screen, then click 'Preview text'.
If you do not provide a custom preview text, the email summary will be displayed instead.
The Footer
The default campaign footer contains an unsubscribe link and the mailing address (represented by the special variable [[EMAIL_TO]])
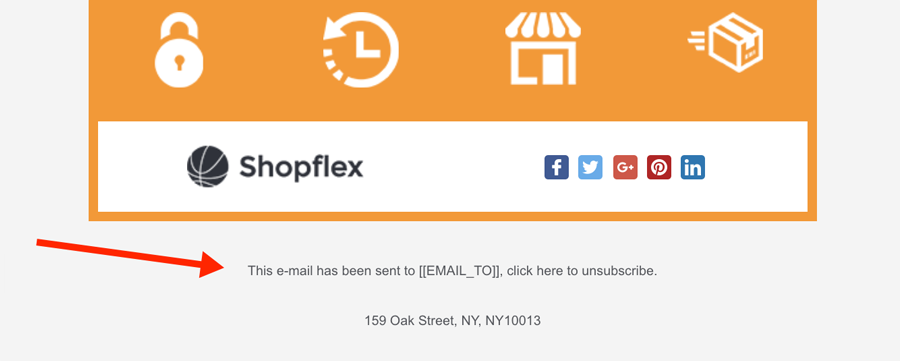
You can fully customize the footer to match your brand. Simply click within the footer section and use the toolbars that appear to customize your footer design.
If you look at the hyperlink for the default unsubscribe link, you will see a special unsubscribe variable:
[[UNSUB_LINK_LOCALE]]
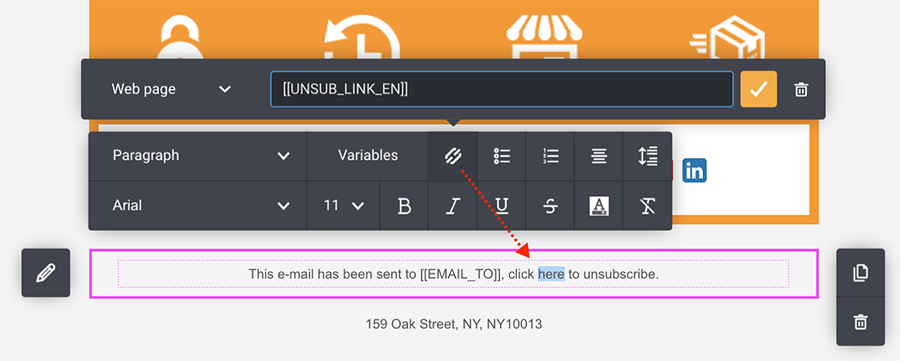
This variable is used to unsubscribe the recipient from the contact list. (The "LOCALE" represents the language of the campaign and defines the language of the subsequent unsubscribe pages, which is automatically handled by the Email Editor.)
You can customize the footer (including that unsubscribe link), as long as you keep the [[UNSUB_LINK_LOCALE]] to enable your recipients to unsubscribe from your mailing lists.
Unsubscribe Page Language
Use this setting to choose which language version of your unsubscribe page is shown when a contact clicks the unsubscribe link in emails using this template. The language you select here applies only to the unsubscribe page, not to the rest of your email content.
Open the Languages panel, go to Unsubscribe link, and pick the desired language from the drop-down list. The languages available here depend on the unsubscribe experience you’ve set up for your recipients (Default, Custom page, or Preference center).
If the language you need isn’t listed, click Manage unsubscribe page to open the Unsubscribe Page Manager and add or edit the languages supported by your chosen unsubscribe experience.
Brand Kit
With our Brand Kit feature, you can effortlessly maintain brand consistency across all your email templates and campaigns. The Brand Kit allows you to set branding elements, such as logos, fonts, and colors, that apply globally to ensure uniformity.
To learn more about setting up and using your Brand Kit, please check out this guide: Mailjet's Brand Kit.
Global Style Settings
With a couple of clicks, easily format the text styles of all your paragraphs, headers and hyperlinks within your newsletter or template.
To access the global text styles, click on the 'Settings' tab.
As the name suggests, the "Global Style" option will set the font family and color for all the elements listed (Headers, Paragraphs, Links) as well as the newsletter header and footer for the current template.
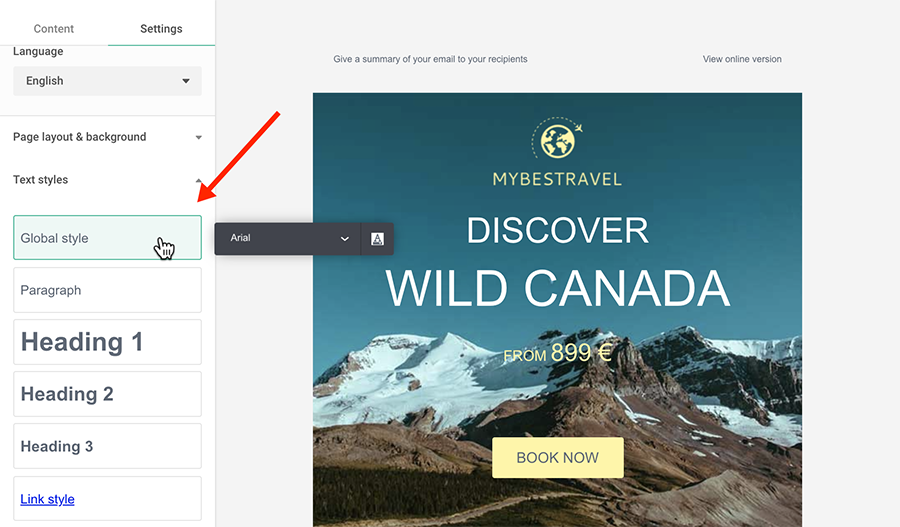
You can then further customize the styling for each of the Headers, Paragraph and Link elements.
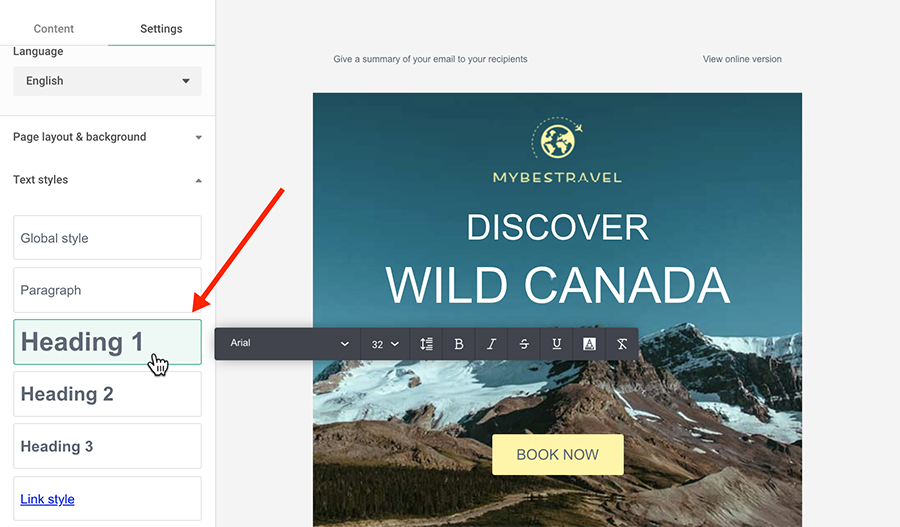
And lastly, if you want to have a different text style for a certain header or paragraph in your campaign, simply style the text as usual with the section toolbar.
Logo Options
When you create a campaign using the Email Editor, a Powered by Mailjet logo is automatically added to the footer.
You can choose from five different logo color schemes in the Logo Options section of the Settings tab.
To remove the Mailjet logo, select No logo. This option is available on paid plans other than the Starter plan.
On the Free and Starter plans, selecting No logo will prompt you to upgrade your subscription.
Import Custom Fonts
Add custom Google fonts or hosted web fonts to your marketing newsletters, transactional and automation templates using the Email Editor.
Important Notice: Use of Google Fonts in your emails may violate GDPR. For more details, click here.
While Google Fonts offer a wide array of typefaces and styles that can enhance the visual appeal of your emails, it's important to be aware that using Google Fonts with Mailjet is not GDPR compliant. Here’s why:
What is GDPR?
The General Data Protection Regulation (GDPR) is a regulation in EU law that focuses on data protection and privacy for individuals within the European Union. It also addresses the transfer of personal data outside the EU and EEA areas. Compliance with GDPR is essential for any business operating within or targeting customers in the EU.
Why Google Fonts are Not GDPR Compliant?
When Google Fonts are used in emails, the fonts are fetched from Google’s servers at the time the email is opened. This process involves the following:
- Data Transfer to Google: When a recipient opens an email that uses Google Fonts, their IP address and other browser-related information are transmitted to Google’s servers. This data transfer constitutes personal data processing.
- Lack of Consent: GDPR requires that any personal data processing should be based on explicit consent from the user. In the case of email marketing, obtaining such consent for every email view is impractical.
- Third-Party Data Processing: Google, as a third party, processes the data. This requires a data processing agreement between the data controller (the company sending the email) and the data processor (Google). Ensuring such agreements are in place and compliant with GDPR is complex.
Alternatives to Ensure Compliance
To maintain GDPR compliance while using Mailjet, consider the following alternatives:
- Self-Hosted Fonts: Host the fonts on your own server. This way, when the email is opened, the font is fetched from your server, avoiding third-party data transfers.
- Standard Web Safe Fonts: Use web safe fonts that are universally supported by most email clients. These fonts do not require fetching from external servers, thus avoiding data privacy issues.
- Inline CSS Styles: Use inline CSS for styling text within the email, which reduces the need for external font requests.
Custom fonts are saved per template. Fonts added in one template/newsletter are not automatically added to newly created ones or if you pick another template from the gallery.
Tip: Duplicate or export your template/newsletter to carry over your custom fonts.
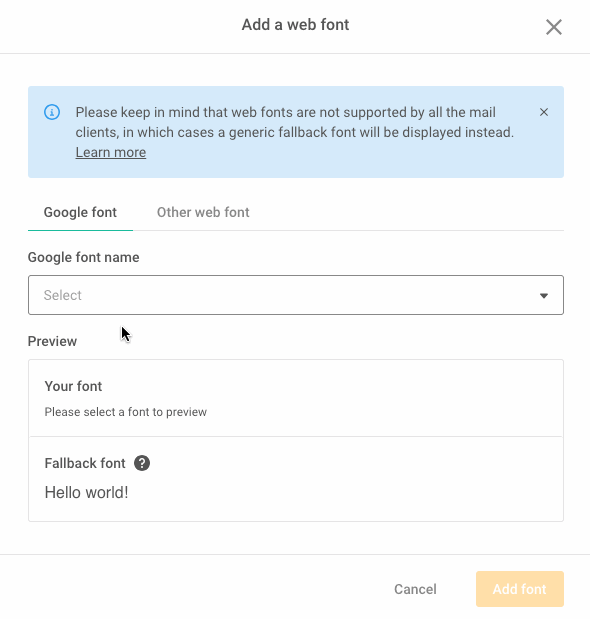
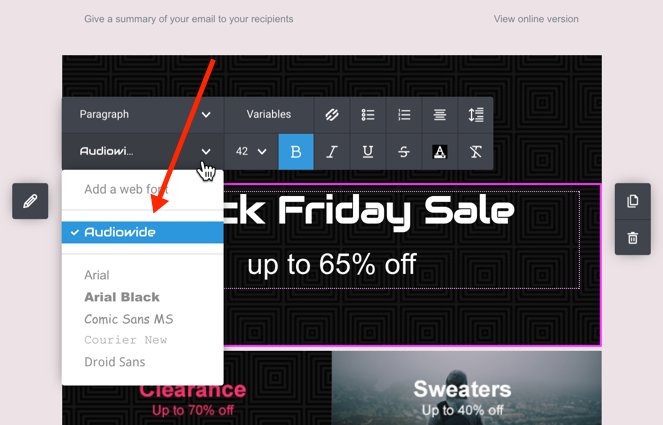
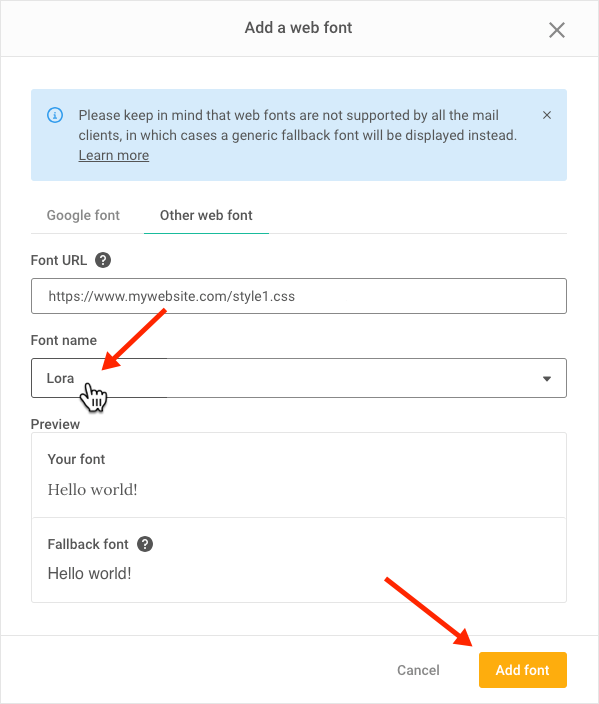
To add a custom font, click on the Font Family drop down list from within a text element, and select 'Add a web font'.
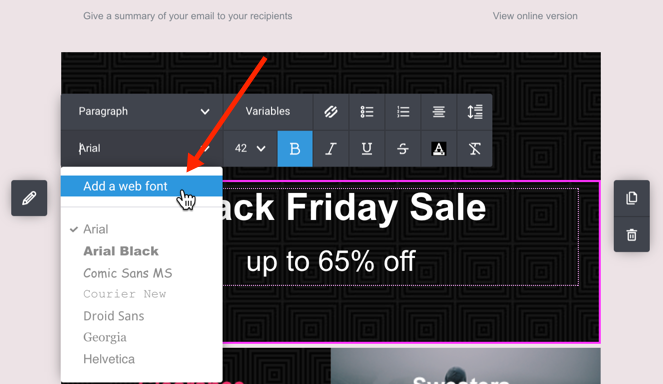
At this point you choose to add a one of over 800 Google Web Fonts or link to a hosted web font via a CSS file.
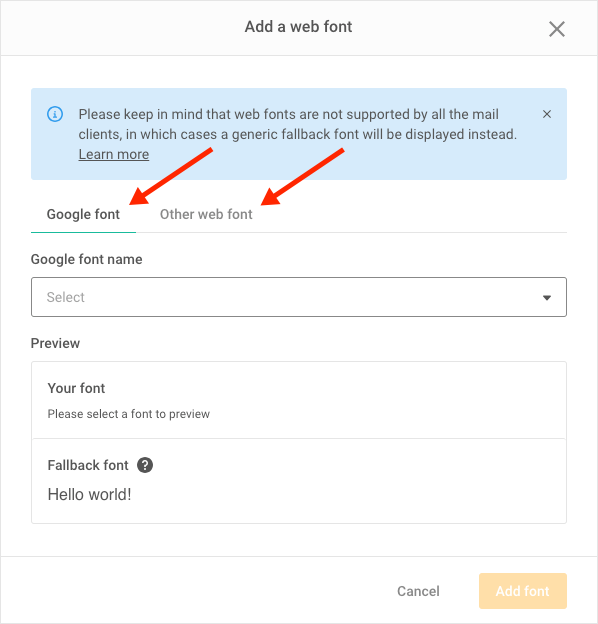
Add A Google Font
Start typing a Google Font name. Once you select a font from the predictive list, the preview window will display the new font. You can also change the text in the 'your font' preview section (up to 15 characters).
The preview section also displays a fallback font.
While some major email clients do support custom web fonts (Apple Mail, Android Mail, iOS Mail, Outlook 2016 OSX…), be aware that some others don't, such as: Gmail, Yahoo! Mail and Outlook 2003. In these cases, the fallback font will be displayed instead of the Google font.
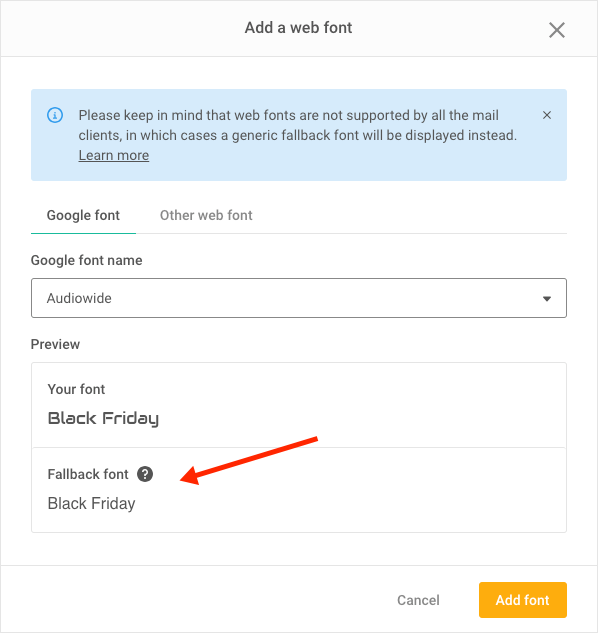
Once you selected a custom font, click 'Add font'.
All custom fonts will be added to the top of the font list in alphabetical order.
Fanatical about fonts? Check out Google fonts to learn more about typography.
Add Other Web Fonts
To add your own custom web font, enter the URL to the CSS file that contains the web font information. A new drop down list will appear showing all the fonts found in the CSS file. Simply click on the font you want to import and then click ’Add font’.
Add a Fallback Font
A fallback font is a backup font that appears when the recipient’s email client doesn’t support or can’t render the primary font used in your design—whether it's a custom or web-safe font. It ensures that your message remains legible and visually consistent across different email clients.
To add a fallback font to your email template:
- Click the gear icon (⚙️) in the left-hand panel of the Email Editor to open the Settings menu.
- In the Settings panel, expand the Text styles section. You’ll see options like Paragraph, Heading 1, Heading 2, and more.
- Scroll to the bottom and click Add fallback font.
- Select a web-safe font from the dropdown (e.g., Arial, Verdana, or Times New Roman). A preview will appear below the selection.
- Click Save to apply the fallback font.
The fallback font will now be used automatically if your primary font isn’t supported by the recipient’s email client.
Personalizing Content
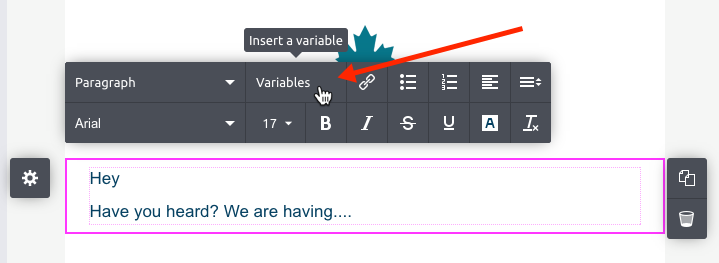
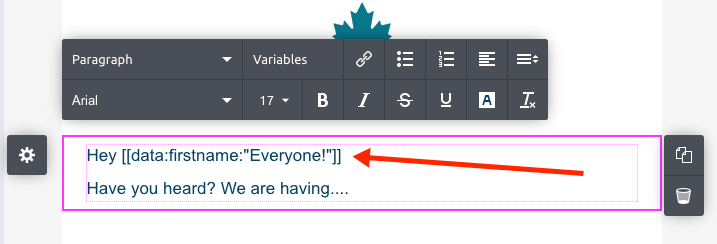
You can customize your newsletter text and subject field by adding your contact properties. Select the text frame where you want to display the personalized content. From the menu bar, click on 'Variables'.
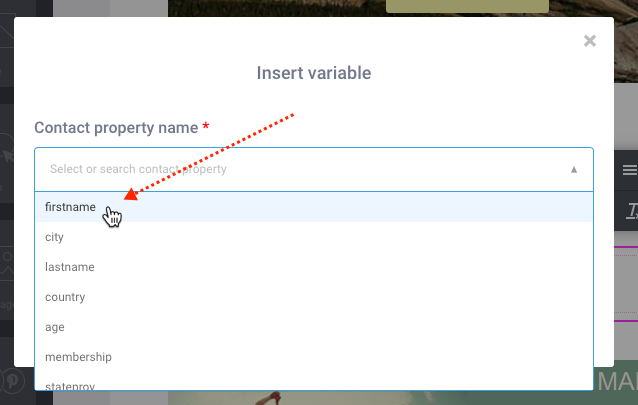
Select the desired contact property.
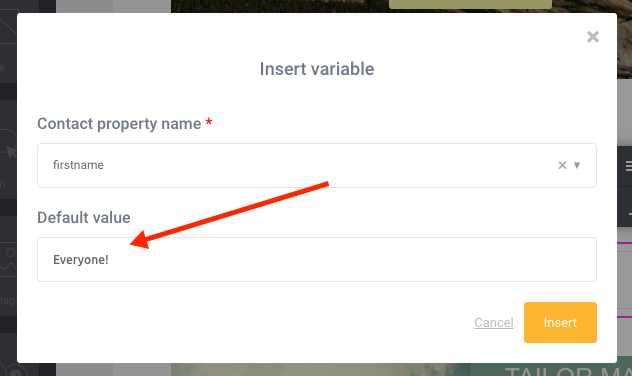
Then enter text in the 'Default value' box. If your contact does not have a "firstname", the default text that will appear instead.
Manage your Mobile View
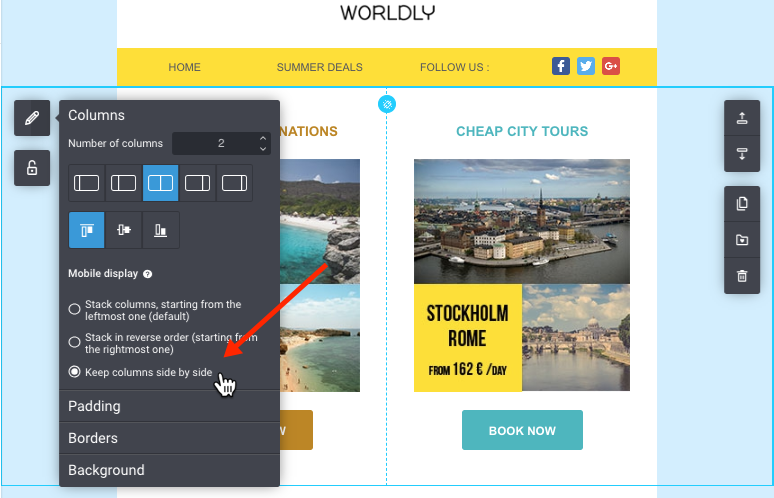
You can arrange how the columns in each section of your message will appear on a mobile device: Stacked (default) or Side by Side
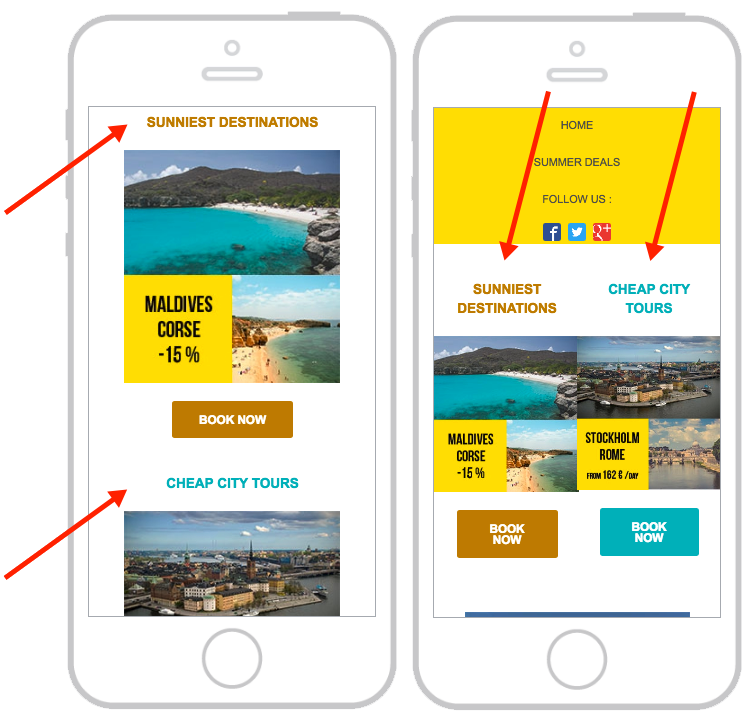
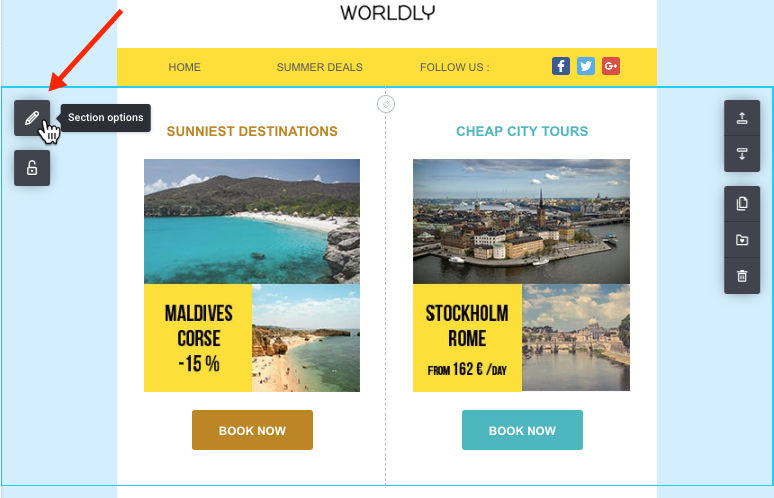
To change a column display, click on the section background then click on the 'Selection Options' icon.
Check the 'Keep multiple columns on mobile' options to display columns side by side. A small blue icon will appear in the section indicating the columns will be shown side by side on a mobile device.
Click on 'Preview & Test' to view how your columns will look side by side.
Responsive Design (Fullwidth vs Boxed)
Our tool allows you to build responsive design newsletters. This means that your newsletter can respond and adapt accordingly to the width of your viewing screen. Your campaign will look awesome whether you view it on a computer/laptop, mobile phone or tablet.
The Setting Tab gives you two options for responsive design:
- Fullwidth: Your campaign width will automatically adjust to the width of the viewing screen.
-
Boxed: The main campaign body width is static, regardless of the viewing screen.
Enable Dark Mode Optimization
The Dark Mode Optimization feature improves how your email displays in dark mode by adding meta tags and CSS rules to your design. This helps prevent unexpected color changes when recipients use dark mode in their email clients. Note that some clients may still override these settings.
To enable Dark Mode Optimization:
- Click the gear icon (⚙️) in the left-hand panel of the Email Editor to open the Settings menu.
- Expand the Email client rendering section.
- Toggle the Dark mode optimization switch to enable it.
- Click Preview to see how your email will appear in dark mode.
Enabling this option helps ensure your email design remains consistent and accessible across a wider range of devices and email clients that support dark mode.
Preview Your Campaign
To preview your campaign click on the Preview & Test → Preview Email.
Your campaign can be previewed on different devices:
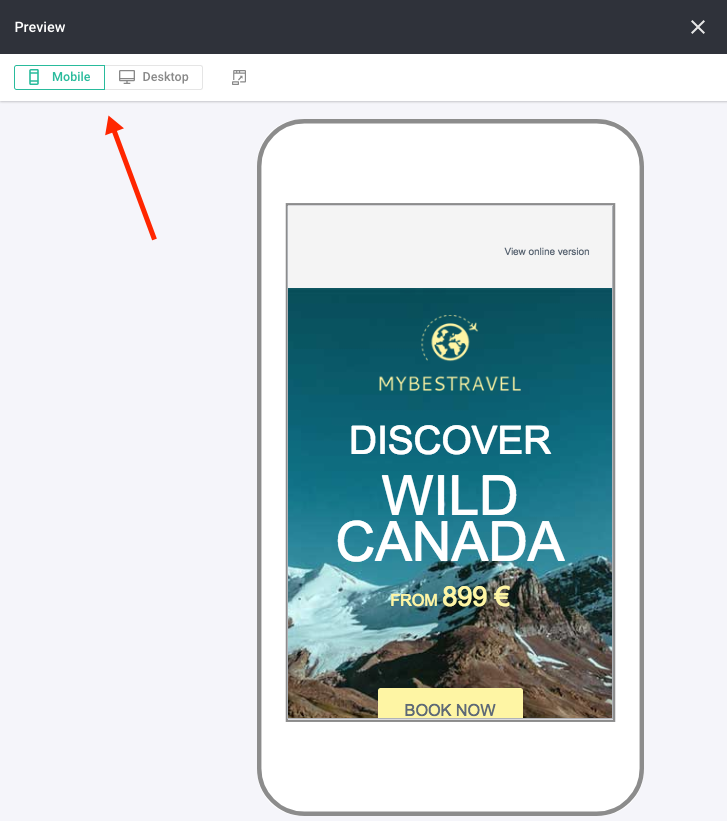
Email Preview
Currently in our Email Editor we provide the possibility to test how a template or campaign will look like on different devices (screen sizes). This Preview gives view only of the responsiveness of the design, however each email client has its specifics.
The problem with email is that every inbox – Apple Mail, Outlook, Yahoo!, Gmail and all of the others – render the same email very differently. While we’re doing our best to offer the best result on all email clients, we have no control over the rules defined by those clients. For example, even Gmail will not render Google fonts and there’s nothing anyone can do about it (except Gmail, of course)!
Because of this, it’s very important to test your email across all of the email clients your audience is using to make sure they’re seeing your message the way you expect them to.
To help you do this, we have just launched a new feature that will help you preview your email exactly as is it will be displayed when read by your contacts.
Discover our "Email preview" feature HERE.
Send a Test email
You can send a test email (campaign) up to 10 recipients at any time.
To send a test campaign, click on the Preview & Test → Send a test mail.
Save Your Campaign
To save your campaign, select 'Save my email' or 'Save and exit'.
To save your campaign as a template, select 'Save as a template'.
Let's step through saving your campaign as a template:
The first time you save a campaign as a template, you will need to enter a template name. You can overwrite the default template name or enter a new template name.
For this example, a new template name will be entered. Then click 'Confirm' to create your new template.
To view your new template, click on 'Back to template selection' from the main menu, then click 'Use one of my templates'.
Send Your Campaign
Once you have worked your magic to create an amazing campaign, and you're ready to send your campaign, click 'Review & Send' from the Email Editor design window.
Back at the 'Create a new campaign' page, you can review all sections and make any changes.
Once all the sections are complete (each section has a green checkmark), you have the option to schedule your campaign up to 60 days in advance or send it immediately.
Congratulations on sending your first campaign.